Marble Dyeing

MarbleDyedHandkerchief2A.jpg

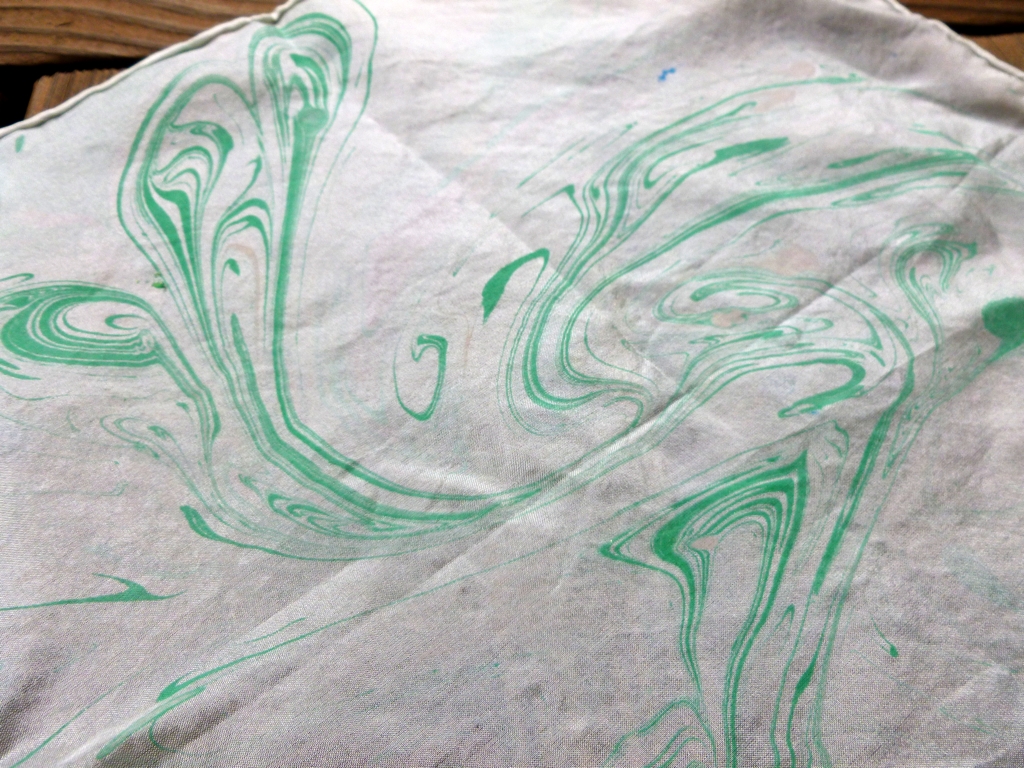
The second Saturday of April came and went while I spent the morning at my favorite fiber guild, The Greater Birmingham Fiber Guild. This month we played around with marble dyeing silk handkerchiefs. I’ve never tried marble dyeing before and was looking forward to learning something new. To dye the cloth, we dropped dye on water thickened with methylcel and then swirled the colors before laying the handkerchief on top. The treated water had the consistency and feel of slime so everything floated.

MarbleDyeBath.jpg

The process was pretty fun and there were some great results after a bit of troubleshooting. Sometimes the dye wouldn’t spread and just fell to the bottom of the pan. Sometimes the dye spread too much. Other times the dye wouldn’t stick to the cloth at all. The secret to marble dyeing might be holding your jaw just right. 

MarbleDyedHandkerchief2.jpg

My first attempt came out pretty well even if it doesn’t look like traditional marbling. I’m going with surrealist peacock feather. The second try was only half successful since only one of the colors really shows. Stare at it long enough and you’ll start to see things. I’ve noticed a few faces, an alien, and an epic fish. What do you see?

Now to figure out what to do with two silk handkerchiefs and stare at marbled paper with new found appreciation. 

MarbleDyedHandkerchief.jpg

Tricolor Elephant

CrossStitchElephant1.jpg

Have you ever seen something and instantly thought of someone? The first time I saw the elephant cross stitch from Red Gate Stitchery I thought of my friend Cece. My second thought was that I absolutely had to make this for her. She loves elephants and I enjoy cross stitch so everyone wins. 

The stitching was easy once I choose the colors and seemed more like moving meditation than handwork. After concentrating on one small segment of stitches and than another, my eyes would zoom out to see the pattern and the elephant slowly forming. Almost seemed like the thread was stitching itself. Almost.

Part of the reason this project was so easy was because of the chart. It was easy to read and took up most of the page. Also helpful was the 4 pages of tips, tricks, and tutorials that came with the pattern. I’m still pretty new to cross stitch and those pages answered several nagging questions I didn’t even know I had. Plus, the whole thing arrived quickly to my inbox. What’s not to like?

CrossStitchElephant3.jpg

Presented for your inspection, the wrong side of the piece which I think is just as interesting as the front. The back is messy with ends sticking up everywhere but the pattern is still visible.

CrossStitchElephant2.jpg

The hardest part of this project was making myself iron the piece and figuring out how to frame it in a hoop. I managed to cheat my way out of ironing with warm water, a sponge, and colorfast thread. As for finishing the back, I did a little research and then promptly did my own thing with some leftover thread and wool felt.

Now that the elephant has arrived at his new home, I’m on the lookout for a new project or I could just finish the last one I started. Decisions, decisions. 

Little Things: Starting Out

Supplies.jpg

Little Things: Celebrating the tiny, sudden joys in life

I love starting new projects. I love researching ideas and variations and all the little details that make up the whole. I love picking colors and gathering supplies. I love finally committing to something and jumping in with both feet. I love casting on, drawing the first line, making the first stitch, and taking the first step.

In the thread, the pencils, the yarn, and the paper, I imagine all the potential just floating around in the ether. When I make that first step, it’s like plucking a bit of that wonderful possibility from the air and solidifying it with my actions and my intent. Doesn’t matter if I’m going for a walk or knitting a new hat, acting on that potential is an great and happy thing.

My latest project is some covert cross stitch. There are just 3 colors but this checkered pattern will be the largest cross stitch project I’ve attempted. Can’t wait to see it finished because I like finishing things just as much as I like starting things. 

So, have you started anything new lately?

EBeginning.jpg

Swatches

CrochetSwatches1.jpg

I may or may not have watched a few video tutorials about crochet on CreativeBug.com. It started innocently enough. The hour was late. I was bored and looking for some entertainment. Yes, I watch how to videos for fun because I like learning and knowing how stuff works. Anyway, up to this point I had watched tutorials on making soap, double knitting, thrummed mittens, stamping, book binding, and whatever else looked interesting. One thing I hadn’t watched were the crochet videos. The first time, I had one eye on my knitting and one eye on the video. Something sparked my interest and, the second time around, I had a hook and cotton yarn in my hands.

CrochetSwatches2.jpg

Previously, all I knew about crochet was how to make a chain for a provisional cast on to use with knitting. I soon figured out how to hold the yarn and hook and set to working swatches. I practiced single crochet, double crochet, triple crochet, and even half double crochet. On other swatches I made spaces, increased, decreased, finished with a few rows of fan stitch. Thanks to this tutorial from The Dapper Toad, I got that whole Magic Circle thing to work but I’m sure I’ll still have look it up every time.

CrochetSwatches3.jpg

Crochet intrigues me because the resulting fabric is so different from knitting. Crocheted fabric is thicker and more structural. Crochet and knitting look nothing alike. After knitting for years, every row of crochet seems like binding off. It’s a fun thought even if it’s not necessarily true. With crochet, I want to make things that I would never consider knitting: sturdy baskets, trivets, mandalas, and cute little embellishments. The Bearded One is particularly excited about durable crocheted slipper soles. 

Surprisingly enough, I think learning to crochet has made me a better knitter. Crochet has given my hands a little extra training that should make continental knitting and two-handed color work much easier. If only knowing how to read a reading knitting pattern meant I could read a crochet pattern. They’re still greek to me. 

CrochetSwatches4.jpg

Incremental January: Week 4

Every month I’m picking one skill to practice everyday for a month and updating my progress every Monday. I call it Project Incremental. Read up on how it all got started. 

| - | - | - |

Last week was all about clearing up the digital clutter - no more unnecessary emails, unsubscribing from overwhelming RSS feeds, and gaining more hard drive space - but I’m back to the physical world this week. I’ve sorted and donated and trashed a lot of stuff to meet my January goal of de-cluttering and prepping for the rest of the year. Lots left to do but the list is shorter.

StuffThings2.jpg

Now that I have less stuff to worry about, I’ve started thinking about how to hack the stuff I have to work better for me. I encourage you do this too. One, you get to make things. Two, you can personalize and upgrade your space. Three, you get to have some fun. 

Over the course of a day, I spend a lot of time in front of the computer which means I spend a lot of time at my desk. It’s a nice desk with lots of drawers, space for all my tech, and enough room to make something when I feel the need. There’s even a raised section with two more drawers and two open spaces that I barely use because they are not drawers. Well, I’ve fixed that.

StuffThings3.jpg

I’ve made drawers for my “Things” and for my “Stuff”. The drawer of things holds all the crafty stuff I need on a regular basis: scissors, buttons, a knitting needle gauge, a tape measure, and random tapestry needles. The drawer of stuff keeps pens, pencils, hair ties, lotion, lip balm, and a needle felted heart. You know, the necessities. Everything I need is at hand and easy to find.

StuffThings1.jpg

To make the drawers, I measured the dimensions to be filled and adapted this handy stiffened felt box tutorial from How About Orange to fit. Next, I drew up the cross stitch charts, stabbed the necessary holes in the felt, and got to stitching. The last step was gluing the sides together to finish the boxes. As a bonus, whenever I move to a new desk, I can just make lids for the drawers and use them a boxes instead. Win win. 

Just in case you feel like labeling any of your possessions with a bit of cross stitch, here’s “Stuff” and “Things” to the rescue. 

StuffChart.jpg
ThingChart.jpg

Needles and Wool

Normally, whenever needles and wool come up in the same sentence, knitting is the first thing that comes to mind. I carry around knitting in my purse. There is an untold number of slightly finished project sitting around my house. Don’t even get me started about yarn. It’s safe to say that I have knitting on the brain. So, at 2013’s first fiber guild meeting, I was presently surprised to learn about a different crafty combination of needles and wool - needle felting. 

To needle felt, you really only need 3 things: a foam pad, wool roving, and a needle. It’s that simple but you can’t use just any needle. The necessary needle definitely isn’t a knitting needle or sewing needle but a thin piece of metal with barbs and a sharp point at one end. Once you have a small ball of roving and the foam pad to work on, just start stabbing. It’s vicious. It’s cathartic. It’s occasionally a bloody experience if you spear one of your fingers.  When the original ball is compacted, add more fiber, keep stabbing, and slowly sculpt the wool to it’s final shape. Then you can add color, embellishments, and numerous details.

NeedleFeltedHeart.jpg

I got to experiment with needle felting by making a heart shaped pincushion. Other guild members made hearts that looked sculpted and delicate. My heart looks like one of those chalky, valentine candies that I eat every year because they are inescapable. I’m tempted to add some sort of abbreviated and completely inappropriate message. 

Repeatedly stabbing a defenseless ball of wool was pretty fun. Plus, I only pricked my fingers a few times and didn’t draw any blood. It was really interesting to watch wool transform from something soft and fluffy to compact and solid. The finished heart is still soft and definitely wooly but very different from the cushy yarn I’m used to working with. FYI, sculpting wool is definitely harder than it looks. The felting process is easy but requires patience, an eye for detail, and practice. It’s not that different from knitting after all.

When I left the meeting, I knew I had fun but wasn’t sure if I wanted to try needle felting again. The heart’s been on on my desk and I keep coming up with all these things I could make. Cool, geeky things. Plus, I’ve got lots of roving leftover from finished skeins of handspun. Looks like I’ll be getting some felting needles soon. 

Origami Stars

OrigamiOrnaments1.jpg

Now that my Christmas cards are in the mail and winging their ways across the States, it’s time to show off the goodness inside: origami ornaments. I like to make ornaments every year for the tree and add them as special touches with friends’ gifts. This year, I’m taking a break from knitted leaves, birds, stockings, mittens, and pom-poms for origami. There’s no lack of holiday knitting around here and origami is a nice change. The ornaments are much faster to fold than to knit, easy to make, and just the right size to mail to friends across the country.

OrigamiOrnaments3.jpg

There are tons of instructions for origami stars across the internet and I fell for the Robin Star by Maria Sinayskaya. This video helped clear up some of the more complicated parts of the folding and assembly. I used 3” foil origami paper and the completed stars came out 4” across. The only thing I changed was to tuck the “triangle”, that is normally folded behind all layers, under the last layer to hide the paper’s wrong side.  Once all the stars were folded, a hole punch (an awl would work too) and some craft thread quickly turned the bunch into ornaments. 

After folding 20 of these stars I have a few tips :

  1. Don’t wait to the last minute. The stars are quick to make but won’t just appear in your hands. I made mine over the course of a week. 
  2. Assembly line the process. Once I’d picked the paper for a particular star, I worked the same fold on all the pieces before moving to the next step. Seemed to make the whole process go a lot faster.
  3. Practice first. Before I started using the small, foil squares, I practiced making the stars from larger paper. I was able to memorize the steps and make sure the process wasn’t too finicky before making the real thing.
OrigamiOrnaments2.jpg

A Happy Diversion

RobinWIP1.jpg

I have grudgingly come to terms with the fact that Christmas and all the deadlines associated with it are less than a month away. All of my knitting, spinning, and general crafty time has been dominated by holiday making. My needles are full. My spindle is heavy. My hands keep cranking out ornaments. As all consuming as it is, I’d rather be working on all this now when I’ve still got some time to spare than waiting till the last minute. Still, my brain rebels every once and awhile and I make something for myself just to take the edge off of the ever looming deadlines. 

Say hello, again, to the little robin cross stitch. He’s not an amorphous blob this time and actually looks like a bird. No name yet but he’s been great at keeping my hands busy during audiobook and podcast sessions. Best of all, no deadline. If I finish him in December, great. If he doesn’t end up on the wall until January, that’s great too. So, if you’re like me and already feeling a bit burned out by the holidays, do something fun for yourself before diving back into the mess. A happy diversion really helps.

Thanksgiving 2012

RobinWIP.jpg

A few day ago I bought a magazine and a kit to cross stitch a cute, little Robin in a round felt frame. With an audio book for company, I’ve worked on it intermediately starting with the pink, then the red, and, next, grey and white. I know it looks like an amorphous blob right now but every stitch makes the small bird perched on a branch more visible. With a little patience, dedication, many more stitches, and some blood - the needle has a taste for my blood, I’m sure of it - there will be an adorable Robin decorating my walls.

This Thanksgiving, which is traditionally a time of reflection, family, and stuffing oneself with food; I’m thankful for my family and friends along with the goodness that is yarn, the internet, burritos, and a cosy knitting nook. What’s near the top of the list though, is the chance to start fresh. I’ll be taking a lot of small steps which, like the Robin, will look like an wiggly blob at first but eventually turn into something great. I’ve got patience, dedication, and people to back me up. Hopefully, I’ll keep all of my blood.

Enjoy your Thanksgiving or Thursday, where ever you be. If you’re working “Black Friday” on Thanksgiving, from someone who’s gone hoarse working the registers at 1AM, I wish you patience, caffeine, and a powerful 1000 yard stare.

To Adventure

HomesteadHollowCabin.jpg

Last weekend was filled with adventure. On Friday, I took a trip up to Springville, AL for the Homestead Hollow Harvest Festival. I indulged in meat on stick (which is always a good decision) and funnel cake. I bought some awesome soap from Earthstone Soap Company which I can’t wait to try out. I fell prey to adorable pottery and took some home. I heard about spinning demonstrations but saw none. Made me wish I’d brought my spindle and acted as an unofficial, walking demonstration.

On Saturday I headed over to Atlanta for food, fun, and general goodness but not before stopping by the fiber guild meeting. The fiber guild cannot be denied, after all, and October’s program was all about rug hooking. The first thing that came to mind when I heard “rug hooking” at last month’s meeting were those fuzzy latch hook kits I’ve seen in craft stores and usually with kittens, or lighthouses, or Homer Simpson (not that I don’t love The Simpsons) on the box. Turns out, latch hooking and rug hooking are not the same thing. When I saw some of the amazing rugs the teacher had made, I signed up for the class.

PumpkinCoasterWIP.jpg

When I arrived on Saturday with an embroidery hoop, I got a cute, little kit to make a pumpkin coaster. The teacher showed us how to move our hands, start the loops, turn corners, and follow curves. Then she set us loose with strips of wool and hooks. I managed to finish the pumpkin’s outline before I left and added a bit more over the weekend. Eventually, I’ll fill in the pumpkin, surround it with black loops and turn the whole thing into a coaster.

PumpkinCoasterSupplies.jpg

Even after years of knitting, months of spinning, and a burgeoning crush on cross-stitch, I am still amazed at the possibilities created by yarn, fabric, needles, hooks, thread, and a little bit of patience. I want to try out and learn about as many of these “possibilities” - like rug hooking - as I can, even if just for a few minutes each. I’ve got to expand my post-apocalyptic skill-set, you know. Seriously, it’s easy to joke about but this urge I have to learn and make stuff is hard describe. What I can say is that I never want to lose it. So, I wish you all the best while you learn, and experiment, and adventure and make stuff, and try new things.  

So, It Begins

Last Saturday, September 22nd, was the Fall Equinox and the official start of Fall. Not that you could tell from the weather around here. Yesterday was a bright and sunny day with a temperature of 84° (29° C) which doesn’t seem like Fall to me in the least. Cooler temps or not, I’ve decided to suck it up and start with the dreaded Halloween, Christmas and Birthday Season making or, as I’ve come to call it, The Gauntlet. If you’re trying to hide from this bit of crafty timing, I apologize.

I’m starting off The Gauntlet this year with a bit of creepy cross-stitch for Halloween and working out the crafting plans for the rest of the year. Anyone else starting the holiday making with me or am I just the bearer of bad news?

Origami for Plying

Since I started seriously learning to spin, I have been monogamous spinner. Just one bump of fiber on the spindles at a time, thank you. I don’t want to confuse my hands with wildly different fibers and jump between lace and worsted weight all in the same day. So when I pick some fiber to spin, I see it through to the end and don’t start something new until the yarn is drying on the rack. For the past few weeks my default spinning project has been a lovely bunch of lace weight singles which are be chain plied for some self-striping goodness. The time had finally come to ply the first singles a few days ago but I only had one plying ball and two singles. I didn’t want to wrap both singles around the same ball since I wouldn’t know where one ended and another began. One single went on the ball and I wrapped the second around a box of sewing pins. That box kept the singles orderly but it wasn’t quiet about it. “Oh, you need more singles? I shall play you the song of my people.”

Until I get around to knitting up a few more plying balls, origami to rescue. I love making modular origami where a bunch of simple folded pieces combine to create something wonderful and complex. Stars are a particular favorite. In the rare moments of silent plying, I remembered the Gudrun Star over on GoOrigami.com. I’ve made them before and they seemed perfect for holding bits of handspun. The stars are simple to make, easy to memorize, and don't take up much space. I made these units listening to podcasts and watching movies.

I know I could have just cut out a few squares of card board instead of folding stars but there is a method to my madness. The extra points make it easier to wrap and secure the yarn. Plus, I’m going to be using these stars a lot and I’d rather look at them than a drab piece of cardboard or an advertisement on the back of a cereal box.

To make your own stars, you’ll need the Gudrun Star diagram from GoOrigami.com and a sheet of scrapbook paper cut into 2 x 3” rectangles. Scrapbook paper is thicker than origami paper but still easy to fold and makes a sturdy star too. One sheet is enough to make 3 stars 3.25” across. FYI, the diagram is in German but the illustrations are clear without the words. Don’t forget that Google Translate is your friend if you need it. 

Once you’ve made your stars, they’re ready for yarn. Hold the end in a valley and wrap the yarn around the opposite side of the star 3 or 4 times. Rotate and repeat. When you can’t see the points anymore, you can wrap the yarn just like on any other ball.

Wrapped and ready to go! Time for some plying that won’t outdo the television speakers. 

For Mom

Pattern: Doublish by Alexandra Tinsley

Yarn: Noro Taiyo Sock

Needles: US 4 (3.5 mm) circulars

Dates: April 4 - 24, 2012

@Ravelry

Wandering around my LYS back in September, this yarn was the only thing that caught my eye. I imagined it as a cute little shawl that would match most of my shirts and and upgrade my usual minimalist style. This idea lingered through Holiday Knitting 2011 and through a prolonged bit of finish-itis. Several projects fewer on the needles, I cast on for this shawl. After I got through the first few rows, I was a woman obsessed. The colors were gorgeous and the pattern was easy enough to knit around town; however, the more rows I knit, the more I knew this shawl wasn’t for me. It was for my Mom. I think I knit a little bit faster after that because my Mom is awesome and totally knit worthy.

I also made one other thing for her and it stole the show. I’m going to have a hard time topping this one.

Puff Phase 3

The Giant Hexipuff continues to hold power over me. Friday night, I stayed up late to finish the decreases. Saturday morning, the puff had a luxurious bath while I assembled my blocking tool kit: pins, blocking wires, a yard stick, and a sheet of pink insulation sheathing.

Saturday afternoon, the puff came out of the bath and moved to the sheathing which has more than made up for the aggravation it took to get home.* Blocking wires made the whole process really easy. I just poked a wire from one corner to the next and let it pull the edges straight from the inside. Adjusting angles and measurements was a piece of cake. Plus, none of those annoying points from using just pins.

Sunday, the puff dried.

Monday, I made a pillow form which I’d never done before. Flew by the seat of my pants for the whole thing too. After I unpinned the puff and removed the wires, I pinned it back down on top of 3/4 of a yard of black cotton. I completely eyeballed the cutting of a half inch seem allowance. Unpinned everything again and re-pinned the fabric together to roughly mark where the seams should go.

Wonky hand stitching go!

Stitching the entire form didn’t actually take as long as I thought it would. I was imaging the process taking place over a few days. Probably didn’t even take an hour. I even flipped it inside out, put it in the puff, and started stuffing it. If only I hadn’t run out of stuffing halfway through. Retrieving more stuffing will have to be Phase 3, I guess. 

If you decide to follow in my footsteps, this last step is entirely optional. When you’re ready to start sewing, move half your work to a table in another room. Return and find a cat requisitioning the rest of it. Like I said, entirely optional.

*Back when it was time to block my Hemlock blanket, I had to find something big enough to pin it out on. The sheer number of blocking boards required were a bit out of my budget. That’s when giant sheets of foam insulation came to mind. The next day I was hauling two 4” x 8” sheets of the stuff out to my car in a Home Depot parking lot. Not that they even remotely fit in my car. So, on a 90˚ day in the middle of summer, I’m slicing giant sheets of foam into quarters and trying not to stew in my own juices. Still, the heat wasn’t as bad as the high-pitched ‘nails on a chalkboard’ sound that came from dragging a knife through foam. Just thinking about that sound makes my head hurt. 

Did you hear something?

Maybe it was the wind in the trees or a squirrel walking across the roof. Or, the most likely possibility, ninjas.

See? Ninjas. I knew it was ninjas. They’re everywhere. You just can’t see them most of the time. 

Pattern: Wasabi the Gregarious Pug by Rebecca Danger

Yarn: A mix of Patons Kroy Sock 4-Ply and Knit Picks Stroll

Full details @Ravelry

Silliness aside, I made these as gifts and, as far as I’m concerned, they are the pièce de résistance of 2011’s Christmas knitting. The idea to turn a dog and a llama (technically, the pattern is for an alpaca but close enough) into ninjas was really fun right off the bat. I only laughed maniacally most of the time. It wasn’t all roses though. They took a lot longer to knit then I thought they would. Plus, besides from the knitting, stuffing, sewing, and faces both of them have round braid kumihimo belts and katanas made from pipe cleaners covered with i-cord. For future reference, making braids out of sock yarn will take way longer than you think. 

Pattern: Zeke the Aloof Alpaca also by Rebecca Danger

Yarn: Also a mix of Patons Kroy Sock 4-Ply and Knit Picks Stroll

Full details also @Ravelry

Making a llama into a ninja was pretty cool but figuring out how to make a removable emo coif (after this first style) was even better. A few steps:

  1. Once you have knit enough of said llama’s (or some other creature’s) head, insert a small, yet powerful magnet inside and hold it in place with another magnet on the outside. You might have to adjust them a bit before stuffing but they’ll stay in place once the llama has stuffing for brains.
  2. Embroider the face with the magnets still holding on to each other.
  3. Remove the outside magnet and knit a case for it. I cast on with Judy’s Magic Cast On, knit and increased in the round. When it was big enough I started decreasing and then pulled the yarn through the remaining stitches. If the magnets are strong enough they should hold through 2 layers of knitting. 
  4. Cut lots of 6” strands of yarn for the hair. You’re going to need them.
  5. Thread a needle with both ends of a stand and push it part way through a stitch on the case to make a loop. Pull the ends through the loop. Repeat until your llama has a nice, full coif. 
  6. Give it a trim and appreciate the awesomeness. 

While I was making these, I was a bit nervous about how they’d be received. Shouldn’t have worried though since they were a big hit. Does a knitter’s heart good. 

Le Pom-Pom

A few nights ago I was feeling a bit like a grump but the feeling has mostly passed and I’ve returned to the whole Christmas thing. The latest Adventures of Superhero Girl sums up my feelings on the matter pretty well. Anyway, presents have been wrapped. Plans have been made to bake cookies. Christmas music, though, still isn’t going to happen. I can only listen to Bing Crosby sing “Frosty the Snowman” so many times before my right eyebrow starts twitching.

The whole Christmas Grump unfortunately didn’t just start two night. It’s been around at least since the start of December and is probably the reason my gift knitting is done. Just didn’t feel like burning that last drop of midnight oil to knit something for everyone on my list. Blasphemy, I know. My love of yarn is still eternal though. It just made a brief layover for pom-pom’s.

Pom-pom’s may be questionable additions to clothing but make excellent ornaments 100% of the time. Way back in November I saw the Clover pom-pom maker at work and was quite intrigued. After buying a set, I dug out all of my leftovers to have a bit of fun. Makes me glad I  don’t get rid scraps and odd grams of yarn even if I don’t particularly like it or know what to do with it at the time.

It took me a while to wind a few dozen grams of sock yarn onto the arms but the end result is worth it. Plus, who knew purposely cutting yarn could be so much fun. It’s almost as fun as fluffing the giant ball of wool that comes out of that thing.

Another fun thing about pom-poms, they’re pretty easy to play with. I turned this one into an apple without any trouble at all. I just slipped the loop through an eyelet and pulled it into place. FYI, the leaf is from the ever so handy Winter Leaves pattern by Lee Meredith. 

Before I go, Merry Christmas and Happy Holidays. Skip the stress and the have a some fun instead. I’ll see you on the other side.

Winners! Also, Kumihimo Tutorial: Part 2

Random.org has spoken! The two winners are GateArte and Katie M. of Brokeknits.com. Hope you have fun! Emails are on the way. 

-----

The focus of this tutorial is how to finish off your braid with crimps and a clasp. If you don't want to add any findings, you can just tie of the ends and go or just have fun experimenting. Anyway, here's what you'll need:

  • Your almost finished braid
  • Scissors
  • Super Glue
  • Scrap Thread
  • Clothes Pin
  • 1 Barrel Clasp
  • 2 8mm crimps
  • Small needle nose pliers

Once you’ve made the braid as long as you want, it’s time to finish it off. Make a little slack on the loom by pulling the working end of the braid straight up.

Then pull the braid and the extra thread back through the hole. Wrap the braid with the scrap thread several times and tie a double knot. Repeat until you have 3 or 4 knots.

Now for the scissors. Just past the wrap and all of the knots, cut off the excess floss but leave the scrap thread. Seal the ends with a drop of glue and pin the scrap thread up in the clothes pin. It makes a handy drying stand in a pinch.

While the glue dries, it’s time to join the crimps and the barrel clasp. The ends of the clasp that I’m using rotate freely so the two can go straight together. First, take apart the clasp so it’s easier to handle. Hold one half of the clasp’s eye with the pliers and pull back the other side until there’s enough space for the crimp. Slip the crimp on to the wire and bend the eye back into place. Repeat for the other half of the clasp and it’s time to attach it to the braid.

Cut off the scrap thread. Then put a drop of glue in the crimps and press in the braid ends. Do something fun while the glue dries.

Once everything is dry, crimp the crimps closed with the pliers.

Time to enjoy your handiwork!

Kumihimo Tutorial: Part 1

Seriously, I can’t stop wearing this thing. Everyday this past 2 weeks, I’ve found a way to wear it and make it work with my outfits. It’s so fun and practical that I can’t let it go. Now, if only I could come up with a name for it. Capital letters and “The” should definitely be involved. Lack of a proper name aside, I must make more. Kumihimo manages to keep my hands busy and give me something crafty to do when knitting isn’t an option but there’s still TV to watch. Rigorous testing has proved it to be a great companion to Buffy the Vampire Slayer.

I’ve fallen hard for Kumihimo and I want to share the love. So, I’m documenting the process with a tutorial and having a little giveaway. Included is almost everything you’ll need to make your own “thing.” The pliers, glue, and scrap thread are up to you. I’ve got two kits. So, just leave a comment - maybe suggest a name and which colors you want- and some way to contact you (email, ravelry ID) by July 30th.

There’s more than one type of braid. They can be round, flat, square, or hollow and, traditionally, they’re made on a round stand or marudai. In this post I’m going to focus on a particular kind of braid, an 8 strand round braid, that is made on a modern equivalent to the marudai - a foam disc. Let’s begin!

Supplies:

  • A kumihimo loom
  • 4 skeins embroidery floss (2 the same color)
  • Scrap thread
  • Yarn bobbins or clothes pins
  • Scissors

You won’t need these until after you’re finished braiding:

  • Super glue
  • 8mm crimps
  • Small barrel clasp
  • Pliers

The first thing to do is prepping your floss for braiding. You won’t a full skein for this project just most of one. Open the skein and make sure the ends are free to grab later. Stretch it around your fingers like yarn on a swift and pull both of the ends at the same time. The floss should come off your fingers tangle free and and nicely doubled.

Cut a nice long piece of thread about 18” and pull it through the loops. Tie the thread in a double knot and you’re ready for the next step - winding. 

Even doubled, the floss is way too long to braid without tangling. Separate the floss into 8 strands and wrap them around the bobbins or the clothes pins. As long as you tuck the working end of the floss into the tip of the clothes pin when you’re finished winding, it should hold itself in place while you braid.

Kumihimo looms and marudai are set up around the 4 cardinal points with numbers marking the individual slots. Pull the scrap thread through the center hole and place the 4 same colored strands (black in this case) on the North South Axis (slots 32:1 and 16:17). Both contrast colors go East to West (8:24 and 9:25).

Now that the floss has been doubled, tied, wound, and arranged on the loom, the hard part is over and you’re ready to braid. In one hand, hold the loom and scrap thread from underneath. Make sure to keep a snug hold on the scrap thread since it’ll help keep the loom in your hand and make it easier to start working.  With North at the top, move the North right strand (1) next to right South (15). There will be one strand at North and three at South.

Next, move left South (17) to left North (31). The strands should be be at two and two again.

Rotate the loom clockwise or you can turn counter-clockwise. Just keep the direction consistent.

Just keep repeating these steps - Right down. Left up. Rotate. - until the braid is as long as you want it. For me, the magic number for a chocker/necklace/bracelet/anklet thing is 45”. To figure out your length, take a piece of string and wear it around your neck (or wrist or ankle) exactly how you want to wear the finished braid. Cut the string at that length and use it to measure as you work.

Unless you’re making a much shorter braid, you probably won’t finish in one sitting. So you know where to begin when you pick up the loom again, move the right strand down and stop. When you’re ready to start again, move the left strand up and keep going as usual.

Good luck, have fun, and I’ll catch up with you next week with how to finish it off and add a handy clasp. Let’s see how many episodes of Buffy I can watch in the mean time. Hope you’re having a nice weekend!

Itchy

At first, I thought the red, itchy bumps covering my skin was an annoying case of poison ivy. This was bit odd since I hadn’t pulled any from the flower beds. What I did pull was up a lot of was Sumac. I can very distinctly remember thinking, “I have no idea what this is but what pretty flowers. Shame I have to pull it.” 5 days worth of insane itching later, I no longer agree with that statement. Just in case you don’t know what Sumac looks like either: photos and info. End PSA.

When the bumps were poison ivy, I tried cortisone cream and a flour paste. Both of these things helped but the itching persisted. When the bumps were upgraded to Sumac, I caved in and went to the doctor for a cortisone shot. Should have done that 5 days ago. It’s barely been a day and the itching is almost gone. I also came home with oatmeal soap and oatmeal bath soak. Just in case.

During those 5 itchy days I did everything I could to keep my mind occupied and my hands busy: playing Hoard, knitting secret things, deciding which book to read, even folding laundry. Anything to keep myself from scratching. So, I decided to work on one of my goals for this year explore different crafts. On that list is Kumihimo, or japanese braiding. It’s perfect since it keeps my hands occupied without being too complicated. Like knitting, it’s a simple set of movements that are easy to memorize and allows for great variety with a little practice. There’s also a meditative quality I rather like. Kind of like garter stitch. Also, I can watch Netflix at the same time.

So, this is Kumihimo and what I’ve been staring at since early June: a loom, 4 skeins of embroidery floss, and bobbins. When the mood struck or it was too hot to knit, I’d pick this up and add an inch or two. 45” later I was ready to tie it off.

When I bought the floss, I just liked the color combination and wanted to braid until I used it all up. After a few inches I liked it enough to wear. I ended up back at the store for crimps and a barrel clasp. The finished piece has become a necklace, a choker, a bracelet, and an anklet. Since it’s braided so densely, it has a nice structural quality and it seems like there’s a thin piece of wire inside. I am utterly smitten.

My photography assistant. I think he tries to look evil in every photo I take.

Eventually, he got bored. You know, when I stopped petting him. 

You’re still here?

Merry Christmas

I got the idea for these fun little cards from a tutorial on Crafty Leftovers.com and couldn’t resist making making a special few to give away for Christmas. Once I got all the cutting done, the weaving went fairly quickly. It was a lot of fun to create different patterns and I like the back just as much as the front. These cards veer off from the tutorial just a bit which only goes to show how much variation can be achieved.

Whatever holiday you celebrate, enjoy the season and have fun with the rest of 2009.