How To Block A Slouchy Hat

How to block a slouchy knitted hat the easy way! | withwool.com

Sometimes the hardest part of finishing a knitting project is figuring out how to wash and block it so that it looks its best, especially hats and slouchy hats. I stalled while trying to figure out how to block my Owl In The Thicket hat after not being able to put it down because the cables were so addicting to knit. How could I block it so that the cables and fabric relaxed evenly?  

How to block a slouchy knitted hat the easy way! | How To Block A Slouchy Hat - withwool.com

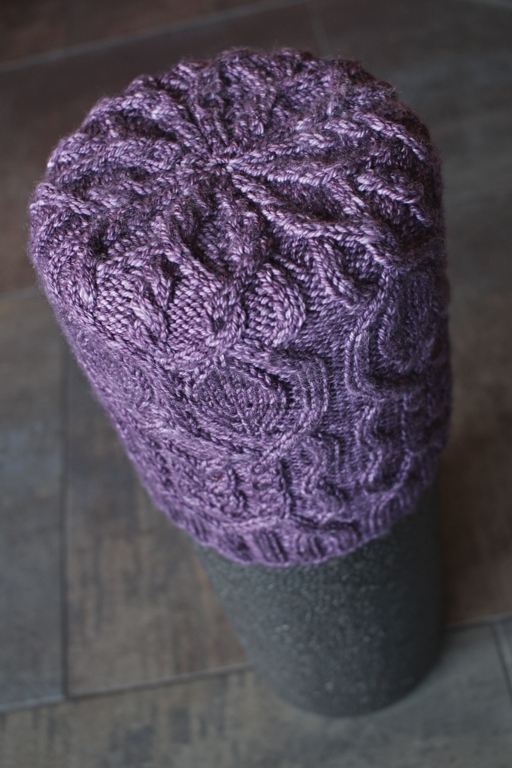
This is the hat after it came off the needles. Looks good, right? The cables are crisp. The shape and length are just right. So why would I need to block it?

How to block a slouchy knitted hat the easy way! | How To Block A Slouchy Hat - withwool.com

This is why. The needles I chose created beautiful cables, but also a firm fabric. It looked more like a gnome hat than the loose slouch that I had in mind when I cast on. The hat wasn't a knitting failure, just unfinished. Skipping blocking was not an option. But how to do it? The cables and fabric needed to relax evenly over the entire hat, so I didn’t want to use a balloon or a ball. And stretching the hat over a plate wouldn’t help since I wasn’t trying to make a beret or tam. So what else would work?

The perfect slouchy hat blocker turned out to be a smooth foam roller. What’s a foam roller? Basically, a dense foam cylinder used to help loosen tight muscles, tendons, and knots before or after exercise. They’re easy to find and not expensive. And when you’re not using them to block hats, you can still use them to work out those pesky muscle knots. The one I have is 18” around which makes it the perfect size for blocking most child and adult hats.

HOW TO BLOCK A SLOUCHY HAT ON A FOAM ROLLER

Step 1: Soak the hat in cool water with a squirt of no-rinse soap for 15 to 20 minutes. I use Eucalan (<<— affiliate link!*) and love it.

Step 2: Roll the hat up in a towel and squeeze out the excess water. Remember not to wring it out which will pull the hat out of shape.

How to block a slouchy knitted hat the easy way! | How To Block A Slouchy Hat - withwool.com

Step 3: Pull the hat over one end of the foam roller. Then you can move it around and make sure the hat and design details aren’t twisted. Plus, since this is foam and not a balloon, you can easily stretch and pin out any lace or crown decreases.

If you want to keep a ribbed brim as stretchy as possible, you can cut the foam to size so that the brim hangs below and un-stretched.  

Step 4: Let it dry, take it off the roller, and enjoy a perfectly slouchy hat.

How to block a slouchy knitted hat the easy way! | How To Block A Slouchy Hat - withwool.com

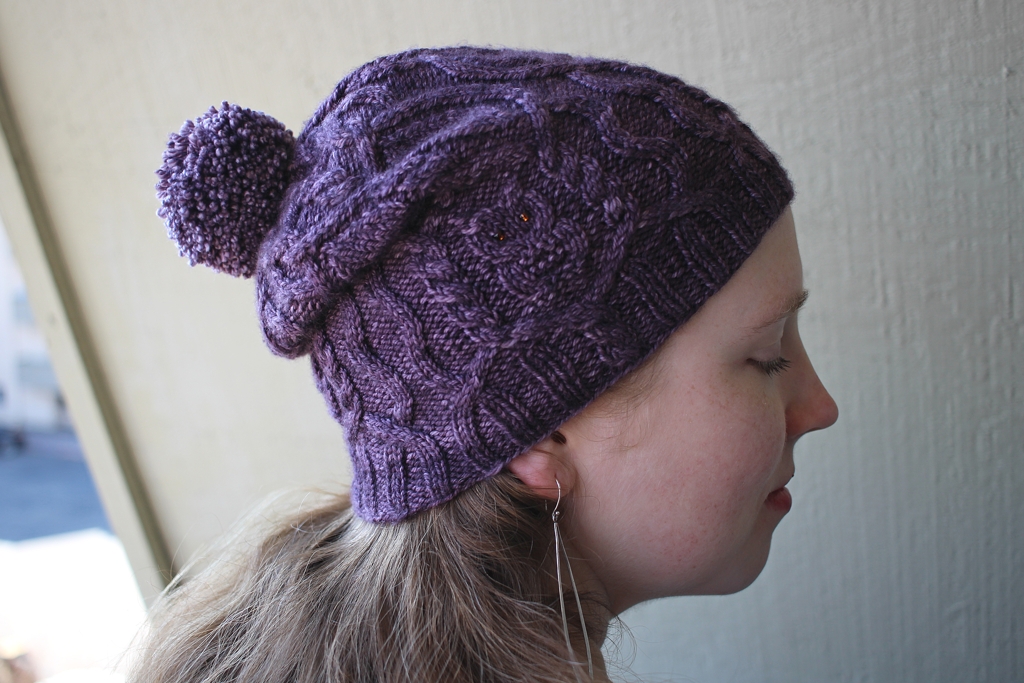
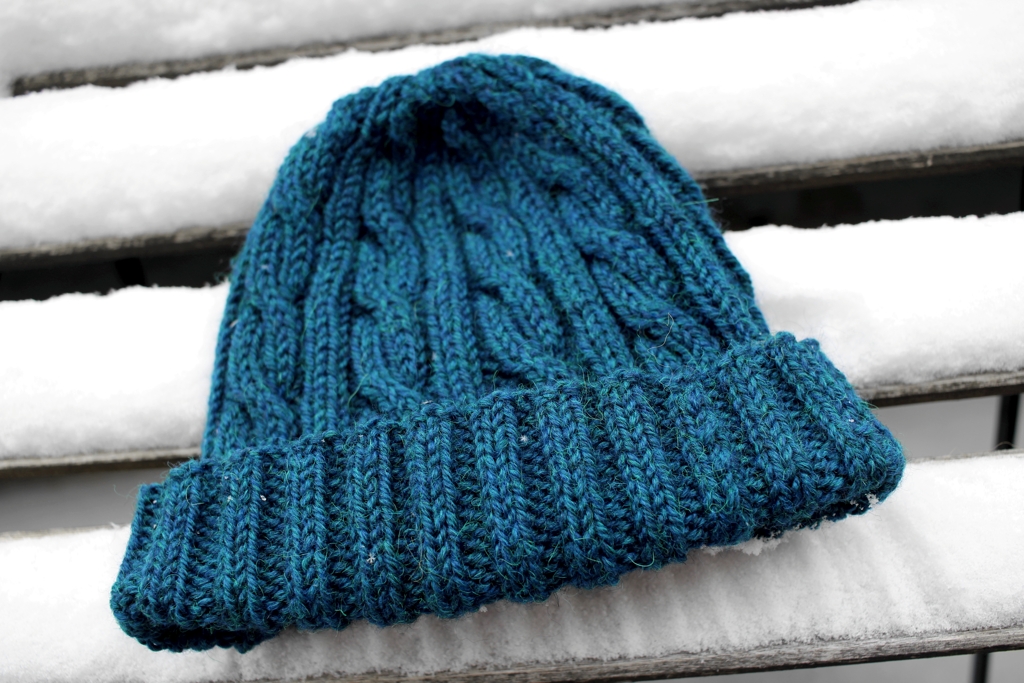
Here’s what my hat looked like after blocking and with the addition of a giant pom-pom. It’s a definite change for the better, and the slouchy hat I wanted from the beginning. Blocking isn’t magic, but it certainly seems like it could be.

*This post contains an affiliate link which means, if you decide to buy through that link, I’ll get a small commission. My opinions are unbiased, my own, and formed after years of use. I wouldn’t recommend this soap if I didn't think it worked well. Thanks!

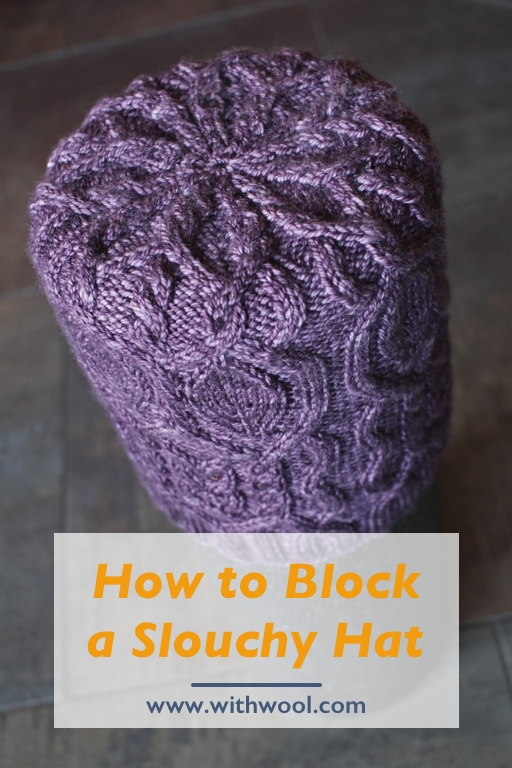
Finished: The Owl In The Thicket Hat

The Owl In the Thicket is my new favorite hat! Cables, owls, beads, cashmere - what’s not to love? | withwool.com

It seems like I say this every year when I finish a new hat, but this is my new favorite hat. It’s soft, warm, and perfectly slouchy. There’s even cables and owls with beaded eyes for good measure. The only thing I’m kicking myself about is that I didn’t cast on until a year after I’d bought the yarn! Still I’m glad it’s finished and just in time for weird spring weather. Will it rain? Will it snow? Look out the window to find out.

The Owl In the Thicket is my new favorite hat! Cables, owls, beads, cashmere - what’s not to love? | withwool.com 

The pattern, Owl in the Thicket by Sara Huntington Burch, was a great challenge. This hat is all about the details and required lots of attention. Aside from the ribbing, there were only a handful of rows that were the same in the entire pattern. I had a lot of fun knitting it, and now I want work on more complicated projects. It’s nice to break out of the auto-pilot knitting every once in a while. And the knitting didn’t actually take all that long because I had a hard time putting it down. I just got hung up on how to block the thing which I’ll show in more detail in my next post.

I splurged on a skein of the recommended yarn, Anzula Cricket in the Lenore colorway, which I don’t do often. The benefit and responsibility of having a large stash means I usually shop from it first. The reason I splurged is that Cricket is a blend of merino and cashmere with a beautiful luster. The yarn was wonderful to work with and the semi-solid dye job added the right amount of detail. I’m glad I didn’t pick out a darker color because then all the cables would have gotten lost which would have been a complete waste.

The Owl In the Thicket is my new favorite hat! Cables, owls, beads, cashmere - what’s not to love? | withwool.com 

The yarn and cables certainly go a long way towards making this my favorite hat, but the pom-pom is what really makes it. I add pom-poms to stuff on a case-by-case basis. They’re cool, but not always necessary. Not this time. The pattern sample looked so good with a pom-pom, and my hat just looked so lacking without one. So I made a very large and in charge pom-pom, but how to put it on? This pom was pretty weighty and used 5 yds of yarn! I didn’t want it to pull the hat out of shape or for it to look tacked on. The answer turned out to be a .5” button. I used this tutorial for how to attach a removable pom-pom. Now, I have no intention of wearing the hat without the pom or taking it off (except maybe to wash it). The button gives the pom somewhere to sit, and that little bit of extra structure makes all the difference.

Now to wait for the weather to get cold enough to wear this beauty. I might not have to wait long with this random weather.

The Specs:
Pattern: The Owl In The Thicket by Sarah Huntington Burch
Yarn: 190 yds Anzula Cricket - Lenore
Needles: US 4 - 3.5 mm
Dates: January 11 - March 11, 2018
@Ravelry

Wooly Links: February 2018

Wooly Links is a round up of the best knitting, spinning, and crochet links I find on the web. The collection goes out bi-weekly in the With Wool Express. You can sign up to get the newsletter full of Wooly Links and other good stuff every week below.


A clear tutorial on how to work double crochet without it turning into a wobbly trapezoid. Saving this for the next time I dabble in crochet.

How to make super fluffy pom-poms

MochiMochiLand is at it again with a cute (and free) knitting pattern for a four-leaf clover.

I was in a bind the other day when I needed to figure out how to space button holes on a button band. This button band calculator from did all the math and made the knitting a breeze.

Knit and Tonic wrote a helpful review of the expanded edition of Vogue Knitting: The Ultimate Knitting Book.

Cute alert! Check out this free crochet pattern for a cactus hat.

As part of the Tuff Socks Naturally project, which explores the durability of socks made without nylon or superwash fibers, @rebeccaspindle shared the interesting history and breeding of the Ryeland Sheep.

Why row gauge matters

Beth Smith shares how she uses sample cards to plan her spinning for large and small projects.

Adventures in natural dyeing with black beans. Follow along with a super detailed attempt at dyeing yarn with black beans. The colors are lovely.

Nora Fok creates wearable art using knitting, weaving, braiding, and knotting. One piece is made of 3,500 knit spheres made from nylon microfilament.

Even a knitter with decades of experience can really screw stuff up.

I’ve never washed a raw wool fleece, but this is the tutorial I’d use if I ever decided to try.

Curious Handmade has written an informative series on how to get started knitting your own socks.

Tutorials for 3 different and beyond-the-basics knitting cast-ons.

And now for something completely different... is about the other interesting stuff I find online. Sometimes it's photography, art, science, crafty goodness, or a good story.

I am continually surprised by the scale and detail that can be achieved with needle felting. Paolo Del Toro makes huge masks similar to Japanese Noh theater masks.

Cayce Zavaglia creates incredible portraits using embroidery, and this behind the scenes interview gives a neat look at her thought process and intention.

Bete Molina uses her background in graphic design to create these incredible patterned quilts.

Bring on the giant, inflatable, light-up rabbits of Amanda Parer! I’d love to see these in person.

A Little Studio Reorganization

I reorganized my studio with the help of some stacking shelves. | withwool.com

I’ve been feeling the itch to reorganize my studio space for months. I stared at it all for a bit before moving on to measuring and mentally rearranging all the furniture. Unfortunately, nothing drastic was going to happen without moving furniture to a different room which just wasn’t an option. But, I wasn't completely out of luck because I was able to stack a second shelf on top of one I already had. That little bit of extra storage space has made all the difference.

I’m not done rearranging, clearing out the clutter, and moving stuff around, by my studio feels so much cleaner and better organized. No more random piles of stuff shoved into corners. Yarn Fort can actually be Yarn Fort instead of a stack of all the things. The tip top shelf is the new spot for all my WIP’s and in-progress designs. My craft supplies, sketchbooks, and art supplies have a designated space that I can get to without moving other stuff out of the way first. And I have some extra shelf space to work with too. It’s great. The only downside of this new setup is that I haven’t figured out where to put the drum carder. It can’t chill on the couch for much longer.

It’s been awhile since Yarn Fort made an appearance, so here’s the stash in all it’s 5’ 7” glory. That’s 1.7 meters for my metric friends. While Yarn Fort hasn’t gotten noticeably smaller since 2016, it is better organized at least.

I reorganized my studio with the help of some stacking shelves. | withwool.com

A Solution to WIP Overwhelm

Feeling overwhelmed and stuck in your #knitting projects? Try working on them 20 minutes at a time. | withwool.com

Normally, I’m a knitter and spinner that has a lot of projects going at any one time because what I want to work on changes. I’ve got simple projects for autopilot knitting, small projects for travel knitting, and complicated projects for a challenge. The large number of these different project usually doesn’t bother me. Usually. At the moment though I’m feeling rather overwhelmed by them all. There’s the baby sweater that’s also a gauge swatch experiment. There’s the shark that still needs a sweater. There’s unfinished gift knitting leftover from the holidays. There’s a bunch of alpaca singles waiting to be plied. There’s all the knitting patterns that I’m in the middle of designing. And never mind the general day-to-day routine and work and projects that aren’t fiber related. Being stuck in the middle of all these different projects with all their deadlines has been weighing me down. So, last week, I took a break to watch tv, waste time online, and play games. The down time helped me think.

Feeling overwhelmed and stuck in your #knitting projects? Try working on them 20 minutes at a time. | withwool.com

The only way to finish these all these different projects is by focusing on just one of them at a time. Rushing to do bits and pieces on 20 things at the same time is just dragging things out. So I’m picking the baby sweater to work on until it’s done. While I can’t finish it in a night, the sweater is the closest to the finish line of everything. Plus, I didn’t have to tackle a bunch of other to-do’s first in order to get back to knitting.

Still, this grand decision didn’t make it any easier to get going again. Being in “the middle” is a slog. When I need a kick in the butt to get to work, I use the pomodoro technique to help me focus. The technique boils down to 20 minutes of work followed by a short break. And repeat. That’s it. I use an app called Focus Keeper which lets me set the length of my work sessions, breaks, repeats, and tailor lots of other nifty options. I use it when I need to get to work or just don’t want to do something necessary, like cleaning the bathroom.

Feeling overwhelmed and stuck in your #knitting projects? Try working on them 20 minutes at a time. | withwool.com

This time I used the app for my knitting. All I had to do was work on the sweater for 25 minutes. After that, I could stop or keep going. Surprise, surprise - I kept going and finished the decreases on the first sleeve. I’m glad I had the timer to keep me accountable because I would have put the sleeve down halfway through otherwise. Figuring out how to work jogless stripes that happened in the same spot as the decreases while I kept track of rounds and carried the other colors up the sleeve took all of my attention.

Feeling overwhelmed and stuck in your #knitting projects? Try working on them 20 minutes at a time. | withwool.com

I’m pleased with how the sleeve turned out except for this hole where I started knitting again. Picking up a stitch at the beginning and end of the round did nothing. I’m going to sew it up with a yarn tail when I weave in the ends. Do you know any tips or tutorials so this hole doesn’t happen on the second sleeve?

Feeling overwhelmed and stuck in your #knitting projects? Try working on them 20 minutes at a time. | withwool.com

Oh, I picked up some buttons too! I found these cute little wood hearts at my local yarn shop. They’re a cute match, and I’m glad they’re the right size since I had to guess if they'd fit.

There’s still a good chunk of knitting to do on the sleeves before I can get to washing and blocking this baby. And I’m going to keep using the timer because it’s helping me get through the slog. Maybe it’ll become a daily goal of one 25 minute session until the sweater is done and buttoned. If you’re stuck in the middle like I am, give the pomodoro technique a try. Even 5 or 10 minutes will get you closer to the finish line and out from under the overwhelm.

How to Clean Stubborn Fiber Out of a Drum Carder

Chunks of fiber stuck in your drum carder? Get a pair of forceps to get those pesky fibers! | withwool.com

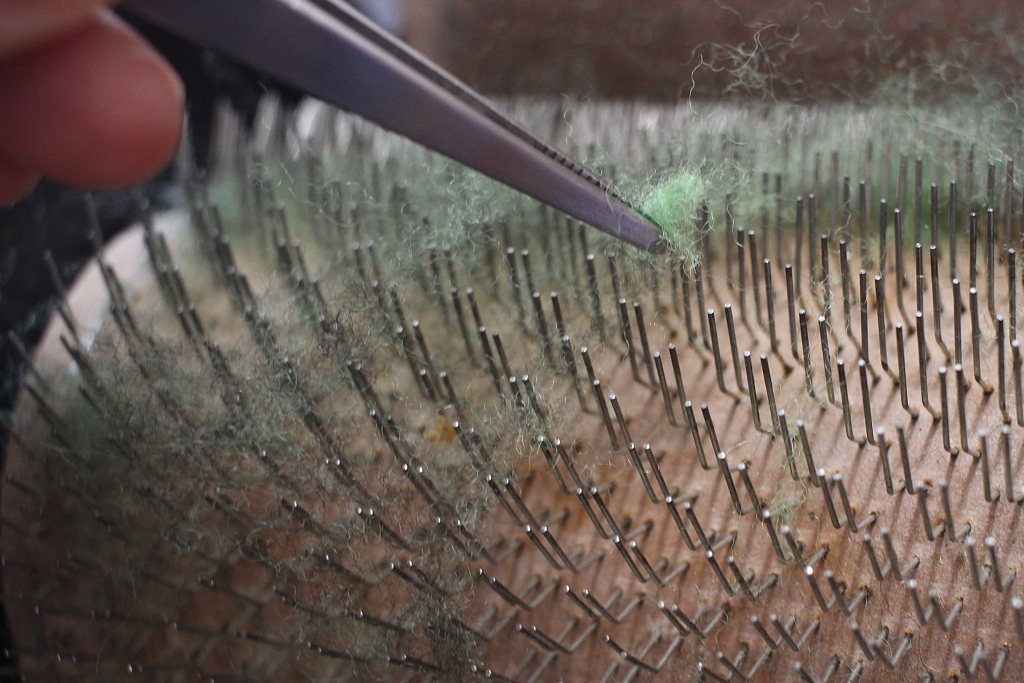
My drum carder has been sitting unused and unloved for the past few months. Why? All this green fiber stuck in the tines. I bought 4 ounces of Corriedale wool locks, AKA the green fiber, to practice making batts and figure out the carder’s quirks. Making the batts turned out to be a struggle because the locks were matted, but I didn’t realize how matted until it was time to feed them into the carder. I had to crank the drum while pulling back on the fiber to get them to open and pull apart instead of just feeding onto the main drum in one big clump. I made 2 batts before calling it quits because the all the  fiber stuck on the main drum. To make things even more aggravating, the stuck fiber only seemed to trap more fiber down there with it. The bent paper clip I attempted to pick the fibers out with didn’t do that great job and none of my other tools did a thing. So the carder went back on the shelf until I could figure out how to clean it.

The answer to my problem turned out to be in a blog post from 2009 (!) that listed the basic tools to use with your drum carder. Definitely worth a read if you’re thinking about getting your hands on a carder. Anyway, one of the recommended tools was a pair of long thin forceps, extra long tweezers, because they’re thin enough to get between the tines without damaging the carding cloth. So I picked up a pair at the hardware store.

This is what my carder looked like before:

Chunks of fiber stuck in your drum carder? Get a pair of forceps to get those pesky fibers! | withwool.com

And this is what the carder looked like after the 23 minutes I spent picking at with the forceps:

Chunks of fiber stuck in your drum carder? Get a pair of forceps to get those pesky fibers! | withwool.com

I didn’t pull off every bit of green since I’m going to try carding the rest of the fiber (it’s a point of pride and stubbornness now), but the difference is night and day. The forceps were great for picking up both small and large bits of fiber. Even better I was able to work them under the larger sections and push the fiber up so I could grab it.

Chunks of fiber stuck in your drum carder? Get a pair of forceps to get those pesky fibers! | withwool.com

Cleaning the the carder wasn’t quick, but the forceps did a great job. They grabbed every stuck strand big or small. Plus, I didn’t scrape or poke my fingers on the tines. Glad I’ve got the forceps as part of permanent drum carder cleaning kit. They’re cheap, work well, and don’t take up a lot of space. Get a pair.

Chunks of fiber stuck in your drum carder? Get a pair of forceps to get those pesky fibers! | withwool.com

How to Measure Knitting Gauge in Ribbing

How to check knitting gauge in ribbing, and what the pattern means when it says stretched, unstretched, and blocked. | withwool.com

Knowing your gauge for a knitting project is important. There’s no doubt about it. But how do you measure gauge when you’re not knitting something in stockinette? And why do patterns list gauge in stockinette when the project is covered in cables or ribbing or slip stitches?

Why is the gauge listed in stockinette?

Patterns usually measure gauge in stockinette because the author is assuming that if you can match their gauge in stockinette, then you’ll be able to match gauge in the pattern’s specific stitch. Plus, it’s also a lot easier to measure stitches and rows on stockinette than on a more complicated stitch pattern. Less room for a miscount that way.

&nbsp;How to check knitting gauge in ribbing, and what the pattern means when it says stretched, unstretched, and blocked. | withwool.com

How to measure gauge in a rib pattern

There are plenty of patterns that list gauge in the dominant stitch pattern of the project too. The specific stitch pattern to swatch will be mentioned with the gauge info. If there’s no stitch pattern listed, the gauge is taken over stockinette.

So what do you do when the stitch pattern is ribbing? Whatever the specific pattern - 1x1, 2x2, 4x2, etc - ribbing is stretchy and the purl stitches hide in the back. How you check gauge will depend on 1 of these 3 words: unstretched, stretched, or blocked. I’m going to include the usual caveat, washing and drying your swatch the same way as the final project will help you get a more realistic measurement.

If the pattern says to measure the ribbing gauge unstretched: Put the knitting on a flat surface and count both knit and purl stitches over the length listed with the gauge info. 2” and 4” are the most common.

If the pattern say to measure the ribbing gauge stretched (or slightly stretched): Generally, this instruction means to pull the ribbing apart enough so that the purl stitches become clearly visible, but they are not pulled tight. You’ll probably need to pin the swatch out to get a true stitch count. Then count the stitches to find your gauge.

There’s a little room for interpretation with this instruction because one knitter might find that the listed gauge too loose or too tight. Or, if you’re substituting a different yarn, said yarn might not behave the same way as the one used in the pattern sample.

If the pattern says to measure the ribbing pattern blocked:  Let’s not confuse the general definition of blocking - washing and drying your knitting to help it be a specific shape or size, not necessarily stretching it - with the word “blocked” as written here. In this specific case, blocking means to wash and dry the ribbing while pulling the ribbing out until it looses it’s stretchiness. It’s important to pin the swatch out to the measurements listed in the pattern while its drying. Then once the swatch is dry and the pins removed, measure the gauge.

An Example of Measuring Ribbing Gauge:

&nbsp;How to check knitting gauge in ribbing, and what the pattern means when it says stretched, unstretched, and blocked. | withwool.com

My Windbreaker hat pattern is based entirely in 2x2 rib, even the cables. So, I wrote the gauge like this:

13 sts and 13 rows = 2” in 2x2 rib, unstretched

The hat is worked in worsted weight yarn, and 13 stitches seems like way too many to be in 2” at first glance. “Unstretched” is the keyword here. Since the measurement is taken over unstretched ribbing, all those purl stitches hiding in the back are counted. The stitches per inch would be very different had the gauge been listed as “stretched”.

The Windbreaker hat knitting pattern by April Klich

Sign up to the With Wool Weekly newsletter to get the Windbreaker pattern for FREE. You’ll also get news about new patterns, blog posts, tutorials, and a roundup of fiber arts links. Plus, get special discounts and bonuses just for subscribers.

With Wool Weekly

Spam is bad. There's none of that here.

New (Free) Pattern: The Windbreaker Hat

The Windbreaker hat is a ridiculously stretchy cabled hat. Quick and easy to knit, the free pattern uses less than 1 skein of worsted weight yarn and is a great gift. #knitting | withwool.com

The Windbreaker hat got the chance to live up to it’s name this weekend. The Bearded One and I trekked through the falling snow, wind, and 19 degree temps to run errands and grab lunch. Every minute outside, the hat kept his head warm and the wind out. No cold ears here.
 
Windbreaker is a ridiculously stretchy cabled hat. Seriously. It fits both me (22") and the Bearded One’s 24” noggin. The secret to this stretch is that the hat, even the cables, are based in 2x2 rib. This has the added bonus of making the hat an easy knit while the cables keep things interesting. And thanks to the long brim, Windbreaker can be worn as a slouchy hat or with the brim folded for an extra layer against the cold.

The Windbreaker hat is a ridiculously stretchy cabled hat. Quick and easy to knit, the free pattern uses less than 1 skein of worsted weight yarn and is a great gift. #knitting | withwool.com

The pattern uses worsted weight yarn, and this hat is made with less than one skein of Berroco Ultra Alpaca (Oceanic Mix). Both written and charted instructions are included for the cables and crown decreases. The pattern includes two sizes, medium and large, and an option to work a longer section of cables and a shorter brim.

Add it to your queue and favorites on Ravelry!

Sizes: Medium (Large) - Shown in size Large which fits a head circumference up to 24" (61 cm)

Needles: US 7 (4.5 mm) 40" circular needle (for magic loop) OR 16" circular needle and DPN's

Gauge: 13 sts and 13 rows = 2" (5 cm) in 2x2 rib, unstretched

Yarn: 130 (145) yds / 119 (133) m worsted weight yarn. Shown in Berroco Ultra Alpaca - Oceanic Mix.

Notions: Cable Needle, Tapestry Needle

Sign up to the With Wool Weekly newsletter to get the Windbreaker pattern for FREE. You’ll also get news about new patterns, blog posts, tutorials, and a roundup of fiber arts links. Plus, get special discounts and bonuses just for subscribers.

With Wool Weekly

Spam is bad. There's none of that here.

A Gauge Swatch Update and Yarn Chicken

Want to know if you’ve got enough yarn for your #knitting project? Here’s a simple way to find out. | withwool.com

I’ve been working on the Pacific Coast sweater for the past week. The “just one more row” litany has been good motivation to keep knitting. After regularly checking that the stitch counts were correct, I finished the raglan increases and put the sleeves on waste yarn. Now my little WIP is finally starting to look like a cute sweater! And I’m loving the stripes more and more with every row.

Since I’m using this sweater is part of a little swatching experiment, which you can read all about here, here’s an update. The sweater is about 6” from cast on to my current row, and my gauge has remained consistent across the entire length and width. Said gauge still matches up with swatch #3, the un-pinned chunk of stockinette. I was curious if the switch to working fewer body stitches would change my gauge after the constant increasing of the raglan. So far, no.

Want to know if you’ve got enough yarn for your #knitting project? Here’s a simple way to find out. | withwool.com

One thing that has been nagging me though is if I have enough yarn to knit all the stripes. I’ve got plenty of purple, but only one ball each of the green and grey. And I really don’t want to buy more. Before casting on, I made sure I had the required yardage, but I still couldn't help but wonder if I’m playing yarn chicken. So I’m falling back to my tried and true method for estimating yardage.

Want to know if you’ve got enough yarn for your #knitting project? Here’s a simple way to find out. | withwool.com

Step 1: Weigh the yarn ball in grams (the math is a lot easier in metric). I’ve got 35g of light grey.
Step 2: Knit a 4 row stripe and weigh the yarn again. Now I’ve got 32g of grey which means each 4-row stripe uses about 3g of yarn.
Step 3: Now it’s time to make math work for me. I’m knitting 10 more 4-row stripes so I’ll need a total of 30g of green and grey combined to finish the body. I’ve got 70g which leaves plenty of yarn to knit both the body and the sleeves. Definitely not playing yarn chicken and I’m rather pleased about that.

P.S. If you're not working by the stripe, work by the inch or centimeter and with the final length of the project instead. 

This is a simplified version of how I usually calculate and estimate yardage. I’ve written up a tutorial for the more detailed method which you can find here.

Now that I’m not worried about running out of yarn, I can get on with the rest of this sweater and enjoy the knitting. And since this is made with fingering weight yarn, there’s lots of knitting to enjoy.    


Wooly Links: December + January 2018

Wooly Links is a round up of the best knitting, spinning, and crochet links I find on the web. The collection goes out bi-weekly in the With Wool Express newsletter. You can sign up to get the newsletter full of Wooly Links and other good stuff every week here.


Got a hole in your handspun sweater? Here’s how to reclaim the yarn.

Even if you don’t spin, this article on the differences between woolen and worsted mill spun yarn explains the differences - durability, warmth, color, stitch definition - between the two types.

This post by Elise Blaha focuses on knitting and sewing, but the overall focus on getting started making your own clothing applies to any craft. About time, cost, knowing what to make, supplies...

Techniques for advanced swatching: cables, lace, in the round, and fair isle.

Kate Davies outlines how to estimate yardage to make a pattern larger using her Carbeth jumper. I use a similar method myself for all sorts of projects.

Loving the cosy simplicity of the Earthshine cowl by Hillary Smith Callis.

The new issue of Twist Collective is live and it’s packed with good stuff.  Patty’s Purls of Wisdom tackles lying gauge swatches and how to get a swatch that tells the truth.

The Harmonium Slouch Hat by Kelly McClure is a great mix of slouchy and fuzzy.

A Guide to Reversible Cables that look good on both sides.

The Vintersol sweater keeps popping up in my Instagram feed and I love the yoke more and more each time.

Knitter Nina Dodd and photographer Joseph Ford collaborate to create hand knit sweaters that blend in seamlessly with the background. They’re all so good!

I’m looking forward to listening to this interview with Rachel Denny who makes incredible knit and crochet sculptures of deer and yaks. The photos are incredible!

Strauch Fiber released two worksheets to track and keep notes on making batts and spinning yarn to keep all of the details. (via Mielke’s Fiber Arts Newsletter)

The Winter 2017 edition of Knitty is here with plenty of good stuff inside.  My favorites are the Skew Too Mitts, the Cool Bearing sweater, and the Stellen Socks.

Try out this neat trick to figure out what the weight of that label-less yarn is. Good for figuring out whether a yarn would be a good substitute too.

Now this is a spinning kit! Jillian Moreno shares what she carries for her every day spinning and teaching. So much good helpful stuff in there.

If you’re on the hunt for gift tags for your hand made gifts, Alisa Burke put together a colorful collection.

Emily Wessel of Tin Can Knits wrote a great essay on developing the knit “grit” and stamina to get past self-doubt, the middle slog, and finishing.

This DIY llama ornament is pretty cute and looks simple to make too.

A cute idea to use of leftover yarn for a pair of striped socks. I’m keeping this in mind for later.

I love the simple undulating texture of the After Midnight mitts by Thea Colman.

And now for something completely different... is about the other interesting stuff I find online. Sometimes it's photography, art, science, crafty goodness, or a good story. 

Amy Joy Watson combines wood, rope, and paint to create these beautiful hanging sculptures.

Take a look at how pencils are made. The photos are incredible. Definitely gives a new appreciation for how this commonplace tools are made.

Need some cute today? Here’s cats wearing hats made from cat hair. The Princess Leia wig is great.

Impressionist paintings? Nope, close-up photos of Jupiter taken on NASA’s Juno Mission.

Everyday objects arranged into incredibly detailed patterns. My favorite is the rainbow of forks and toothpicks.

The 80-year-old timber escalators of the Wynard Station in Sydney, Australia were turned into a beautiful suspended sculpture for the station’s renovation.

Knitting A Gauge Swatch That Tells The Truth

#Knitting a gauge swatch is an important first step in making a sweater. So how do you make an accurate swatch? | withwool.com

This year’s knit list includes a sweater or two because I haven’t made very many of them, and I want to change that. I’ve only knit 1 sweater for myself in the *ahem* decade+ since I first learned to knit. It was the Amiga sweater, and it was cute and just the right size until I blocked it. Afterwards it was still cute, but had turned into an oversized cardigan. I definitely wore it, but it wasn’t what I set out to make or wear. I did all the things the knitting police said you’re supposed to do: knit a big swatch, used the same needles, and blocked the swatch the same as the finished sweater. I got gauge, or so I thought, but the swatch didn’t tell the truth. So for this first sweater of 2018, I’m taking a more rigorous and experimental approach to swatching. Instead of making just one swatch, I made three.

#Knitting a gauge swatch is an important first step in making a sweater. So how do you make an accurate swatch? | withwool.com

For swatch #1 I cast on enough stitches to equal 4” and a little extra for a garter stitch border. I added stripes as in the pattern and a section of 2x2 rib knit on smaller needles.  Then I washed and blocked the swatch the same way I would the finished sweater. The square was a little uneven at the sides so I pinned it out to straighten the edges. This first swatch answered a few different questions.

Would the dye bleed between the different colors? No.
Would I like knitting the fabric on the needles I had? Yes.
Would I like the fabric after washing and blocking? Yes
Did I like the stripe pattern? Yes
Did I have the right needles to knit the ribbing at a tighter gauge? Yes.
Did I get stitch and row gauge? No, my gauge was off on both counts.

#Knitting a gauge swatch is an important first step in making a sweater. So how do you make an accurate swatch? | withwool.com

With swatch #2 I was only trying to answer the gauge question. So I went down two needle sizes and tried again. Same stitch count. Same garter border. Same blocking method. This time my gauge was too tight. And I didn’t like the finished fabric - too stiff - or knitting it.

#Knitting a gauge swatch is an important first step in making a sweater. So how do you make an accurate swatch? | withwool.com

I didn’t cast on for swatch #3 right away because I didn’t have the right size needle. My needle collection has been lacking a 3mm circular for years and this was project the first reason I had to buy one. In between refreshing the package tracking, I happened to read this article on how to knit accurate swatches and how to keep them from lying to you. Contrary to a lot of what I’d read up to this point, the advice was to skip the garter stitch border and not pin the swatch at all during blocking. The article is definitely worth the read and explains the why’s behind all of these tips.

So I switched things up and followed the advice in the article: skipped the border, worked 6” worth of stitches instead of 4”, and plopped a swatch of stockinette in the sink to soak. I didn’t pin it out or even try to control the roll as it dried. Know what? I finally got both stitch and row gauge. The fabric was nice to knit and has good drape. Win win.

So why do I “trust” this method of swatching to tell the truth? It’s given me numbers and measurements that didn’t require pinning and pulling on the fabric. Plus, the accuracy for swatches knit with borders and pinned is far from 100%. There’s no reason to not try it out. And if the sweater does grow, at least it’s a baby sweater and a little extra room isn’t a bad thing. 

#Knitting a gauge swatch is an important first step in making a sweater. So how do you make an accurate swatch? | withwool.com

Since it seemed like I made an accurate swatch, I finally cast on for that sweater. It’s the Pacific Coast baby cardigan by Gabrielle Danskknit. It starts at the neck with a bit of ribbing before moving on to the stripes and raglan increases. My gauge is spot on. There’s still a lot of knitting to do before this beauty gets the blocking treatment, but I’ll let you know if gauge swatch #3 lied or told the truth.

17 Fiber Arts Things That Made 2017 Great

I’ve enjoyed making lists since I was kid and I don’t see that changing any time soon. I wanted to write up a 2017 review, but couldn’t muster up the energy or motivation to write about in paragraph form. So, I’m taking a page from Austin Kleon’s blog and making a list of the knitting and spinning that made 2017 great. Somehow the 2017 list was 17 items long without any extra help from me.

All the #knitting and #spinning that made 2017 a great year. | withwool.com

1. The Bearded One and I going to our first fiber festival, Estes Park Wool Market.

2. Completing 100 Days of Spinning where I spun and worked with handspun yarn for almost all of those 100 days.

3. Putting in the work to design more knitting patterns. Most of them didn’t make it past the layout stage, but they’re so close to being released in 2018.

All the #knitting and #spinning that made 2017 a great year. | withwool.com

4. Releasing the Melded Scarf, a free pattern for a striped reversible scarf, in February.

5. Knitting a Boneyard shawl with my own handspun yarn.

6. Mostly staying on the sheep and being more conscious about my yarn and fiber buying. The stash is still worthy of the name Yarn Fort, but it hasn’t taken over any more space.

All the #knitting and #spinning that made 2017 a great year. | withwool.com

7. Spinning along with Tour de Fleece for the 5th row in year.

8. Pushing my spinning boundaries to try new batts and more textured yarns.

9. Going to Interweave Yarn Fest.

10. Finally playing around with the drum carder and figuring out how to use it.

All the #knitting and #spinning that made 2017 a great year. | withwool.com

11. Digging into my fiber stash and spinning a beautiful gradient from one giant batt. 8 matching skeins!

12. Taking my first ever spinning class about different ways to spin color with Maggie Casey.

13. Going to meetings and being a member of my local fiber guild.

All the #knitting and #spinning that made 2017 a great year. | withwool.com

14. The KIS hat and Mosaic Sisters patterns being used to teach classes on color work and mosaic knitting respectively.

15. Getting a whole room to use as my studio where I can work and get to all my art supplies, yarn, books, and notions. Wanted this for years so it’s great, but scary too.

16. Developing a new appreciation for hats knit with fingering weight yarn.

17. Wearing and enjoying my own hand knits. And seeing the Bearded One wearing and enjoying his hand knits too.

A Half-Finished Hat

Cables, owls, and beautiful yarn make a hat that’s hard to put down. #knitting | withwool.com

I’ve been planning and working on other projects this past week, but the Owl In The Thicket hat has been my go-to knitting. The complicated chart means it’s not great for travel knitting so I’ve been using it as reward knitting instead. Got 5 minutes before the next pomodoro timer starts? Put a round on the hat. Crashing on the couch at the end of the day with some tv? This WIP is going to be in my hands. At first glance the chart and instructions look really complicated, and they do require attention. The secret is that the hat is worked in bite-sized repeats which makes even complex rounds doable. So all those random chunks of time have added up rather quickly. Knitting to see the owls and leaves appear in the stitches might have had something to do with it too. I’m not far from the crown decreases when I was sure that I’d be working on this hat for at least a month instead of a few weeks.

Cables, owls, and beautiful yarn make a hat that’s hard to put down. #knitting | withwool.com

While I love the complexity of this pattern, the yarn is another big reason that I’m enjoying this knit. For once I’m actually using the recommended yarn, Anzula Cricket. It’s a DK weight yarn and a blend of merino, nylon, and cashmere. It is wonderfully soft and feels great moving through my fingers. Plus it was a lovely luster and a semi-solid dye job that I really love. The yarn adds interest to the pattern without detracting from it.

Working on this hat has also come with one unexpected benefit. It’s given me a perfect opportunity to practice cabling without a cable needle. There are lots of different cable twists, even on the same rounds, but they’re all easy to do. The hardest part was just getting all the symbols straight in my head. After a few dozen rounds, I have twisting cables without a cable needle down pat. Those complicated sections are definitely going a lot faster without that extra needle in the mix.

Cables, owls, and beautiful yarn make a hat that’s hard to put down. #knitting | withwool.com

I missed my chance to wear this hat during the most recent snow fall, but it was also nice to work on this project and watch the snow coming down. Pretty sure the hat will be ready for the next storm though at the speed I'm going .

The Last Knits of 2017 and Then Some

You wouldn’t know it by the snow falling outside, but it’s 2018 and the frenetic season of gift knitting is over and done. Well, not done for me. There’s still a few unfinished projects still on the needles, but they’re smaller things. Still, I am happy with what I did get finished, and it’s no small amount of knitting.

Scarves, hats, shawls, and socks - 2017 saw a lot of gift knitting. | withwool.com

This is the second time I’ve knit the Elder Tree Shawl as a gift. One of these days I’ll make one for me. The pattern can be subtle or so so dramatic, especially if you add beads to every leaf. I used a single skein of Colinette Jitterbug which made a shawl-ette perfect for wearing tucked in to a coat. I also added beads to the picot bind off for extra sparkle.

Scarves, hats, shawls, and socks - 2017 saw a lot of gift knitting. | withwool.com

I wasn’t sure what to make for a friend of mine, so I asked her what she wanted. She requested baby socks. Funny how well asking works. I picked up 2 skeins of Patons Kroy Socks FX, each a different color, and got to work. The charts in Kate Atherley’s Custom Socks where really helpful for getting the measurements I needed once I knew the length. As for the pattern, I used my my own basic toe-up recipe and sized it down. Both pairs came out pretty cute if you ask me, and there’s room to grow too.

Scarves, hats, shawls, and socks - 2017 saw a lot of gift knitting. | withwool.com

I tried something a little different last year and put something for myself on the gift list too, the Owl in the Thicket hat. It wasn’t a reward for finishing everything else, but a gift for myself because why not. I bought the pattern and the yarn a year ago and never made it to casting on. So I pulled out one of my favorite knitting bags and made a kit. I wound the yarn, printed the pattern, got the right needles, put the beads on my Fleegle beader, and gathered all the notions. While I didn’t actually cast on until after New Year’s Day, it was so nice to have that kit ready and waiting. I’ve finished the brim and am a few rows into the body charts. It’s been awhile since I’ve knit such a complicated chart, and I’m enjoying the change of pace. The yarn is lovely too. Why did it take me a year to get started!?

As for the stuff I didn’t finish, the first projects was a pair of socks for the Bearded One. Still working on the cable design for that one. The other is a hat which I’m halfway through designing. Plus, there’s a handful of ornaments from previous years which I haven’t started yet. At least I have a plan. Is anyone else finishing up their gift knits in January or getting on with the new 2018 knits instead?

A Christmas Nautilus + A Break

Weird ornaments are the best ornaments. #knitting | withwool.com

The fiber guild’s last meeting of the of the year is a break from the usual routine. We have a potluck and play white elephant with handmade ornaments. For the potluck, I brought pumpkin spice cookies. For the ornament exchange, I decided to go cute - weird cute - and made a nautilus.  Actually, I made 2 of them because I wanted one for my tree too.

Weird ornaments are the best ornaments. #knitting | withwool.com

I used the Nautie pattern from the Spring 2006 issue of Knitty. To get a smaller version, I used leftover DK and sport weight yarn instead of worsted which made nicely-size ornaments. I’ve got the full list of mods and changes here if you want to make your own. Both the Nauties are about 5.5” from the back of the shell to the tip of the tentacles. You can’t miss them on the tree. I still have to embroider 2017 on the one I kept, but that shouldn’t take too long.

Now, back to the exchange. I’m glad I went with the nautilus instead of a more traditional idea. The nautilus got a lot of laughs and ooh’s and aah’s. It was also “stolen” a few times which did make me happy too.

Weird ornaments are the best ornaments. #knitting | withwool.com

The nautilus’ are far from last FO for 2017, but the others are still a secret. I’ll share them with you next year when I come back from my holiday break in mid-January. Until then, Happy Holidays and Happy New Year. Maybe it be full of beautiful yarn!

Weird ornaments are the best ornaments. #knitting | withwool.com

A Handspun Boneyard

Handspun yarn + Procrastination = The Perfect Shawl #knitting | withwool.com

I’ve wanted to knit a Boneyard Shawl for years. Not with the burning desire that makes you drop everything and head to the yarn shop, but when I eventually found the right yarn. Eventually is the key word. I wanted a variegated yarn that’d be fun to knit and fun to wear. I’d know it when I found it. I didn’t find that perfect yarn because I ended up spinning it during the 2017 Tour de Fleece. It’s a thick-and-thin variegated mix of greens, blues, and browns. The skein is one of my favorite yarns that I’ve spun this year, and was thrilled that I had enough yardage to make something big out of it. Well, bigger than a hat anyway.

Handspun yarn + Procrastination = The Perfect Shawl #knitting | withwool.com

With 260 yards of aran weight to work with, I knew it was finally time to cast on for a Boneyard Shawl. So I did, and it was a fun knit. The shawl was so hard to put down because it was good auto-pilot knitting and I wanted to see what color would come next. The only change I made was to switch out the m1’s for lifted increases.

Handspun yarn + Procrastination = The Perfect Shawl #knitting | withwool.com

The only trouble came when I was trying to figure out how much shawl I could knit. There were still a few yards left and I didn’t want to waste any of them. So, the Boneyard sat on my desk for months, mocking me, while I worked on other projects. The shawl would probably still be sitting on my desk too if I hadn’t needed a break from all my holiday gift knitting. I’d knit 7 ridges already and decided to start the edge and see how far I got. A few tv shows and an inch of garter stitch later, it was time to bind off. Why did that take me so long to do? Ugh! At least I made the most of the yardage.

It may have taken years to find the right yarn and also a good bit of procrastination, but this Boneyard Shawl is just what I imagined. It's cosy, just the right size to wear under a coat, and special. Also, it feels good to knit with my own handspun in the same year that I made it. Who knew?

Handspun yarn + Procrastination = The Perfect Shawl #knitting | withwool.com

The Details
Pattern: Boneyard Shawl by Stephen West
Yarn: 253 yds 2-ply aran weight handspun
Needles: US 9 (5.5 mm)
Dates: August 20 - December 2, 2017
@Ravelry

6 Tips for Finishing Last Minute Gift Knitting

Whether you’re just casting on or have a long knit list, follow these tips to get your #knitting wrapped and under the tree. | withwool.com 

There’s no denying it. We are smack dab in the middle of the holiday season. There’s not much time left to get those knitted gifts bound off and wrapped. Whether you’re just casting on or started early and still have a chunk of stuff to stitch, follow these tips to get that stuff under the tree.

Make a list, and check it twice.
I know it’s tempting to just get started, but a list of what you’re making and for whom is your best friend. The “knit this” list might not seem that long in your head, but could be a bit more daunting on paper. Trim as needed to save your sanity and make sure you get a few hours of sleep here and there. Plus, you’ll be able to make sure you have all your supplies ahead of time and skip late night trips to the store.

If you’ve got a lot of people to knit for, stick to small projects.
Hats, fingerless mitts, small toys, ornaments, washcloths, slippers/chunky socks are all fair game. T-minus twenty days and counting is not the best time to cast on for that heirloom lace weight shawl with patterning on every row.

Go big.
Thicker weight yarn, worsted and up, works up way faster than fingering weight. A cabled hat knit in worsted weight yarn can be quick project with big impact.

Give yourself some wiggle room.
That color work stocking might take more time than you think. Or you could run out of yarn and have to make a late night shopping trip. Or you want to enjoy the holiday season and parties without furiously stitching through every one of them. And you can take well needed breaks. Your wrists will thank you when they’re not sore and stiff on December 26th.

Monogamous knitting works.
Hear me out. Knitting one project all the way through goes so much faster than splitting your knitting time between 5 different WIPs. I stuck with monogamous knitting in November 2017 and rocketed through a scarf, two hats, the 2nd half of a shawl, and a bundle of ornaments.  If you really can’t stand the thought of one project at a time or need some out and about knitting, focus on just two projects. One can be simple and the other complex. A little variety can help get you over the “don’t want to work on this” hump.

You can quit.
Seriously, you can quit. Maybe there’s a point where you look at your knit list and know that there’s no way it’ll be finished, late nights or not. I’ve been there. It’s frustrating. The upside is that you’re in control of your knitting, goals, and plans which means you can decide what’s right for you and your time. And if you don’t tell people what you’re making them, they can’t be disappointed it’s not done. So get some sleep, go to that party, and ditch the added stress.

Wooly Links: November Edition

Wooly Links is a round up of the best knitting, spinning, and crochet links I find on the web. The collection goes out every week in the With Wool Weekly newsletter. You can sign up to get the newsletter full of Wooly Links and other good stuff every week here.


Clare Devine of knitsharelove.com is conducting an experiment to try out sock yarns spun without the added durability of nylon. I’m curious to see how it turn out.

Halloween is behind us but the amazing skeletons crocheted by Caitlin McCormack from discarded textiles deserve a look no matter the time of year.

Looking to expand your stranded color work library? Tin Can Knits has some suggestions to help get you started.

5 Tips for Getting Gift Spinning (and Knitting) Done

“A Day in the Life of a Fiber Mill Owner” is an interesting behind-the-scenes look at running a fiber mill.

And here’s a look at the commercial process of skeining and prepping yarn for yarn shops.

A pretty convincing argument for 2x2 rib to be the stitch pattern to teach new knitters. What do you think?

The Sheep Spot newsletter has a great article on different methods to reduce striping in handspun yarn and fabric.

I love the colors and strong stripes of the crochet Tangram Wrap from One Dog Woof.

Here are some simple printable gift tags for when you finish up all that gift knitting.

Ambah O’Brien shared a tutorial for making ombre pom-poms which look like a lot of fun. I’m tempted to make a few as ornaments.

I’ve been enjoying Felicia Lo’s new vlog, Taking Back Friday, which covers her current knitting and weaving projects, yarny events, and her thoughts on making. Check it out.

A nearly invisible knitting increase is a good thing to know. Knit.Love.Wool demos her favorite version in a top down yoke.

How about a pattern for some cute crochet leaves?

The pattern for the Fox Isle Socks is just too cute. It would definitely scratch that color work itch.

Need a little fiber arts inspiration? Rebecca Mezoff shares her favorite sources for fiber art inspiration and the comments are full of good stuff too.

A solid gift guide for the knitters and crocheters in your life. And yourself too.

There’s no doubt in my mind that knitters can come together and do powerful things.


And now for something completely different... is about the other interesting stuff I find online. Sometimes it's photography, art, science, crafty goodness, or a good story. 

Dennis Cherim’s The Coincidence Project is an ongoing series of exceedingly well-timed photos that you’ll have to look at twice.

To help get you into the winter spirit, take a look at First Snow.

Take an armchair trip to Iceland’s impressive countryside.

War and Pieced documents wartime quilts sewn by soldiers from military uniforms. I would love to see this in person.

Sewing and NASA go hand in hand.


Monogamous Knitting For The Win

A little bit of monogamous #knitting works! I knit a scarf and hat in 2.5 weeks.&nbsp; | withwool.com 

I did it! Two and a half weeks of monogamous dedicated knitting turned into cabled scarf and a matching hat. It’s nice to know I can still speed my way through a project or two every now and then. Why the rush? The scarf and hat were gifts for a friend visiting over Thanksgiving and I wanted to give them to him in person. Nothing like a hard deadline to light a fire under under your butt.

A little bit of monogamous #knitting works! I knit a scarf and hat in 2.5 weeks.&nbsp; | withwool.com

I spent way too long trying to pick out a pattern which is part of why I cast on at the last minute. Nothing seemed quite right, and I was just about to give up and design something myself when the Palindrome scarf popped up. Easy reversible cables? Yes, please. I knit this pattern way back when as a newish knitter and was pleased with the results then. And I’m pleased again with this latest version. The only difference this time is that I made a few mods. The scarf started and ended with 2.25” of ribbing. I added an extra cable repeat for width. Plus, cable twists happened every 8 rows for a looser cable.

I can’t leave out the yarn’s wonderful contribution either. Normally, I wouldn’t choose Ultra Alpaca for a cabled project because the alpaca/wool blend wouldn’t have the same crisp texture as a 100% wool yarn. I wasn’t worried about that in this case since the purls would be “hiding” and not acting a background for the cables. The blend created a beautiful textured fabric that is perfect. And warm. Did I mention warm? The main reason I picked a wool/alpaca blend was that it’d be worn through winters with regular snow, wind, and freezing temps.

A little bit of monogamous #knitting works! I knit a scarf and hat in 2.5 weeks.&nbsp; | withwool.com

And because the weather required it, I made a matching hat. I did end up coming up with a pattern for this beauty at the last minute. My original plan was to have both the scarf and hat finished before he arrived. That didn’t quite happen. In fact, I knit most of the hat in front of him and figured out the crown decreases on a drive through the mountains.  Then I gave it to him mere moments after weaving in the ends. The look on his face was totally worth it.

I am absolutely smitten with this hat pattern. So much so that I’m writing it up with a few more sizes so I can knit at least one more for myself or as gifts. I’m all for versatility. In the meantime I’m getting on with the rest of my gift knitting and making. Since monogamous knitting has been working for me, I’m going to keep it up. Thankfully, the rest of my projects are on the small side so I won’t get bored and can power through.

The Pattern: Palindrome Scarf and a hat pattern I’m writing up
Yarn: 3 skeins Berroco Ultra Alpaca
Needles: US 7 (4.5 mm) circulars
Dates: November 5 - 24, 2017
Scarf details @Ravelry
Hat details @Ravelry