4 Hours

SurtugalWIP3.jpg

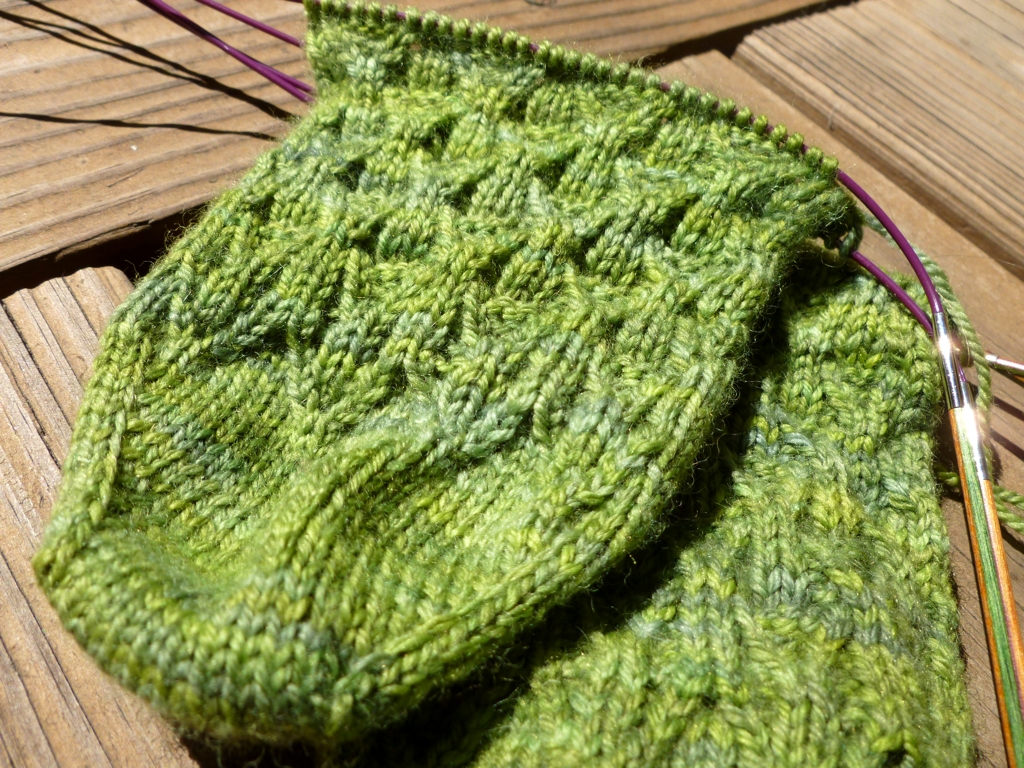
It took going on a road trip to find my sock knitting mojo. The Shur’tugal Socks are fun to knit and the pattern is easy to remember despite the 12 row repeat. Still, the frequent twisted stitches/faux cables aren’t the easiest thing to pull off while jaunting about town. I’ve been hauling the pair around in my purse since February and not making much progress. I was almost ready to cast on for a simpler pair but then, all of a sudden, road trip. 

4 hours in a car is a long time and plenty of time to work twisted stitches. I finished the toe of the second sock, worked the first chart, and launched myself into the instep pattern. Progress was made. Since I returned home, the momentum is still going. It might only be a few rows while waiting or a repeat while catching up on podcasts but I’m getting closer to finished socks. Before I can bind off, I’ve got to do some math and figure out where to start the gusset for a helpful heel flap. Way to excited about knitting a standard heel flap but they are my favorite heel. Also have to knit the cuffs but I’ll get there.

Do you have any stalled out projects that have suddenly become interesting again?

Knit Night

KnitNight.jpg

My attendance at knit night this year has been woefully lacking but I was able to make it last night. Foul weather and great mileage did not keep my away this time. The Sapling Hat was finished and delivered, so I took a new project out on the town with me. 

Part of the reason I love going to knit night is to catch up with friends and revel in the craft. Sometimes, there is more commiseration than celebration over knitting but the time is good for that too. Another reason to go is that I can leave my more involved projects behind for something fun or a recently rediscovered work in progress. Sometimes, the just for fun projects become the more involved projects but that’s a risk I’m willing to take. 

Three

SaplingWIP2.jpg

Three is the magic number. It’s the number of dedicated projects I can focus on at one time and still get things done. Anything more than that and things start to go off the rails. I lose focus, get bored, and generally accomplish nothing. Eventually, I’ll come to center and shove all the extra projects off to the side. It’s an “out of sight, out of mind” kind of thing. When I do finish something, it’s time pick a new project or come back to something on the to-do list. Then the cycle begins again.

Right now the three major projects are daily photography practice, the sixth Sapling Hat, and a bit of covert cross stitch. Putting a concerted effort into improving my photography throughout this month is still a very new project. I’m researching and experimenting. I’m also trying to find the timing of how to fit regular photography into my day. We’re still getting to know each other. 

The other two projects aren’t so long term. The hat is bound off and drying after a good bath. The cross stitch just needs a bit of finishing and a frame. Can’t wait to be done with both of these projects because I’ve already got a few more lined up. There may or may not be a few more knitting patterns, tutorials, and random goodness coming up. 

E_Progress.jpg

Growing

SaplingWIP1.jpg

The babies are coming! The babies are coming! So, it’s time to knit some hats. 

I’ve knit quite a few Sapling hats in the past three years - Ravelry tells me this will be the sixth hat - and will probably continue to do so. In fact, the whole reason I came up with this pattern was to make a pair of hats for a friend’s nieces. The hat is complicated enough that I’m not bored knitting it for the sixth time but still small enough that I don’t have to slog through it. Also, I just like being able to start at the crown of a hat instead of the bottom. Only have to cast on a fraction of the stitches that way. 

I’m using Elsebeth Lavold Cool Wool which is a slightly thinner yarn than called for in the pattern. To compensate, I working the larger size and knitting the hat entirely on the smaller needles rather than switching needles partway through. No other mods are necessary. 

Time to get back to knitting. Can’t let baby have a cold head after all.

To Frog, or not to frog

To frog, or not to frog--that is the question:

Whether 'tis nobler in the mind to suffer

The knits and purls of tedious ribbing

Or to take needles from a pair of tiresome socks

And by ripping, end them. *

SocksWIP2.jpg

That’s the rub, folks. Should I just suck it up and keep knitting this pair of socks or rip them out and use the yarn for something else? Here’s a little background to help out:

  • I started knitting these socks on my trip to Denver but didn’t get much further than a toe and a few rows of ribbing. So, it’s hard to call them souvenirs. The only thing I remember about Denver when looking at them is waiting for busses that didn’t always arrive. 
  • I’m not all that fond of the yarn, either. The colors are nice but the yarn itself is kind of scratchy. I’ve made socks from this yarn before but they’re not my first, or even second choice, when I’m picking out a pair to wear for the day. 
  • I’ve already come up with some alternate projects for the yarn. It could turn into an i-cord garland, pom-poms, a temari ball, or some sort of crochet goodness. 
  • I have put a bit of work into them. The original plan was to knit tubes and add afterthought heels. One sock is past the heel point and on the cuff. The other sock still has a few inches before it’s time to mark the heel. 

Sounds like I’ve already made up my mind to rip out these socks but, even knowing I probably won’t finish them, I’m having a hard time committing to ripping. Help! 

* I couldn’t resist writing a short parody of Hamlet’s soliloquy.  Check out Shakespeare’s original version at Wikipedia.

Untangled and Complicated

SuretugalYarn.jpg

Generally, winding yarn - the process of turning unruly skeins into handy little center-pull contraptions - is a handy thing to know once one has acquired any amount, prodigious or restrained, of yarn. A swift and ball winder are especially helpful if your stash is of a more impressive size. Winding yarn generally goes something like this:

Step 1. Remove the swift and ball winder from their respective containers. 

Step 2. Attach said items to various overhanging surfaces - the edge of a table or a countertop. 

Step 3. Find the chosen yarn, remove the label, untwist the skein, and place it on the swift. 

Step 4. Free an end of yarn, feed it through the coiled metal arm of the ball winder, and slip it into the notch.

Step 5. Turn the handle and wind the yarn until you have a handy little cake of earth-toned goodness. Or jewel-toned. Or neon. Whatever float’s your boat. 

I ran afoul of these necessary procedures around Step 2 since I’m lacking in a good place to attach a swift. It is much more likely to make a brazen swan dive onto a hard tiled floor then hold yarn for me. Jerk. So, I decided to wind yarn on the ball winder with the open skein hanging over my arm. As you might guess, this did not go as I had hoped. A task that should have taken less than 10 minutes went on for hours as the yarn tangled and was generally uncooperative. One end of the yarn was on the on  the ball winder while the middle trailed off into a giant loop hanging from a bed post. I sat on the other end and was slowly freeing yarn from the giant, tangled mess I had created. When I said I was in the mood for something more complicated, wrangling tangled yarn was not what I had in mind. 

SuretugalWIP1.jpg

What I was aiming for, after knitting several pairs of plain socks, was some more complicated knitting.  The pattern, Shur’tugal by Alice Yu, has been a long time resident of my Ravelry queue. The yarn, Sweet Georgia Tough Love Sock - Lettuce Wrap, is a more recent addition to the stash. I knew the second I opened the package that the skein was destined to become a pair of socks. Too awesome, sturdy, and beautiful for anything else.  

SuretugalWIP2.jpg

So far, the pattern and yarn are a great combination. I can’t wait to knit full fledged socks with heel flaps and everything.

Afterthought Heel Tips & Tricks

Tips & Tricks to take the guesswork out of knitting afterthought heels. | withwool.com 

What happens when I get bored knitting a pair of socks? I start another pair. If the next pair just so happens to be self-striping and knit with heavier yarn, said pair is even more entertaining. I just couldn’t resist. The last in-progress pair or, more specifically, the 3x2 ribbing on the last pair, became mind-numbing. Not even knitting along to the cheesiest and most hilarious of horror movies made the socks any more appealing. Nor did waiting in slow moving lines. Thankfully, stash yarn came to the rescue.

Tips & Tricks to take the guesswork out of knitting afterthought heels. | withwool.com

Yarn: Knit Picks Felici Sport Self Striping - Kingpin

Needles: 2.5 mm

Date: January 7 - 29, 2013

@Ravelry

Self-striping sock yarn was a lot more fun to work than just plain 3x2 ribbing. No, the irony of a plain vanilla sock being more interesting than ribbing is not lost on me. Uninterrupted striping yarn really is that good. Just knit, adding in a few increases/decreases as needed, and the yarn does most of the work.

Tips & Tricks to take the guesswork out of knitting afterthought heels. | withwool.com

There were a few “Why didn’t I think of this during the last pair of afterthought socks,” moments that I’m sharing to save you the trouble.

1. When figuring out where to open the heel, measure the length of the toe. If you’re working toe-up measure the toe once it reaches the final stitch count. If you’re working cuff down, measure from where you started decreasing. Toe length and heel length will usually be the same unless you make the toe very pointed. Subtract the toe length from the total foot length measurement for where to place the heel. 

For these socks, the toe length was 1.75”  

10.25” - 1.75”= 8.5”  

From the tip of the toe, I measured 8.5” and marked the rounds with thread to follow Cat Bordhi’s afterthought method. The finished sock came out just the right length and fits wonderfully. 

2. Weigh the finished toe to know how much yarn to put aside for the heel. This trick requires a scale but removes all the guess work. When knitting toe-up, measure the weight of the ball before and after you finish the toe. The difference, multiplied by 2, is how much yarn is needed for the heels. 

If you’re working from the cuff, this trick isn’t as helpful since knitting the toe is one of the last steps. Instead, you could pause to knit the heel, measuring the difference in weight, and leave that much yarn to work the toe.   

If you’re using self-striping yarn and want the colors to match, like I did with this pair, wait to cut the yarn until you know which color the heel falls on. This is easier to do with toe-up socks than cuff down unless you’re knitting the cuff to a certain length. Either way, keep an eye on the stripes and finish before you knit up all of that color.

Begbie

Begbie1.jpg

Deep stash yarn and quick, repetitive knitting, by your powers combined, I have the first Christmas* gift of 2013 ready and waiting. Whoever saw this coming, it definitely wasn’t me.

Begbie2.jpg

Pattern: Begbie Cowl by Jane Richmond

Yarn: Noro Kochoran - 40

Needles: US 10.5 (6.5 mm)

Dates: October 27, 2012- January 27, 2013

@Ravelry

This is not the part of the post when I write with smug satisfaction about my dedication to getting a head start on my holiday knitting. This is the part of the post when I tell you about last year’s holiday gift knitting that just wasn’t given away. Every year, the fiber guild I belong to has a big party and a gift exchange in December. Last year’s exchange was scarves. I decided to start early and cast on in October. Multiple episodes of Twin Peaks later, I had a bound off scarf that just needed a good block to be finished. Then said scarf sat in a box until January because I went out of town instead of going to the party. Oh well, it’s blocked and ready to be gifted now. 

Begbie3.jpg

This scarf has been much improved by blocking. The stitches are even and lay quite flat. I was also able to stretch it out and make it a bit longer. Even better, all the angora in the yarn bloomed and created this beautiful (and I’m assuming warm) halo. 

All finished, this beauty gets to hang out in a box waiting for just the right occasion or just the right person. Might have to wait until Christmas or just next week. Either one is just fine.  

* or Birthday/Mother’s Day/Solstice/Flag Day/Random Gift Exchange gift

How to Sew on a Button with Handspun Yarn

How to Sew on a Button with Handspun Yarn | withwool.com

The snow made me do it. Seriously, the only reason I finally sewed the buttons on my latest pair of mitts was because it was cold and snowing. Being able to take photos of said mitts in the snow might also have had something to do with it.  Part of the reason for the wait was that I could never find thread to match the handspun. The thread was too blue, too purple, not blue enough, or not even close. The yarn itself was made of so many different shades of blues and purple that I couldn’t find a good match. Thankfully, I still had a few useable scraps of leftover yarn. Then it was a just problem of attaching the buttons in a way that looked finished instead of just tied on. Solved.

How to Sew on a Button with Handspun Yarn | withwool.com

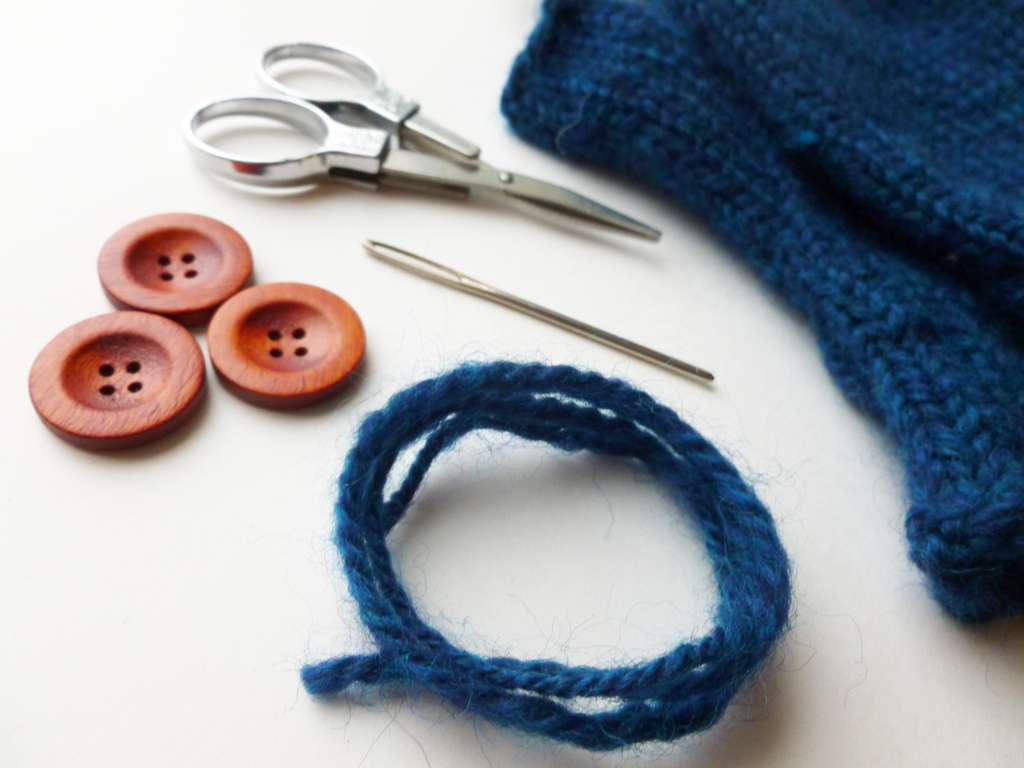
1. Gather your supplies: buttons, yarn, scissors, your almost finished object, and a tapestry needle to fit through the button holes.

How to Sew on a Button with Handspun Yarn | withwool.com

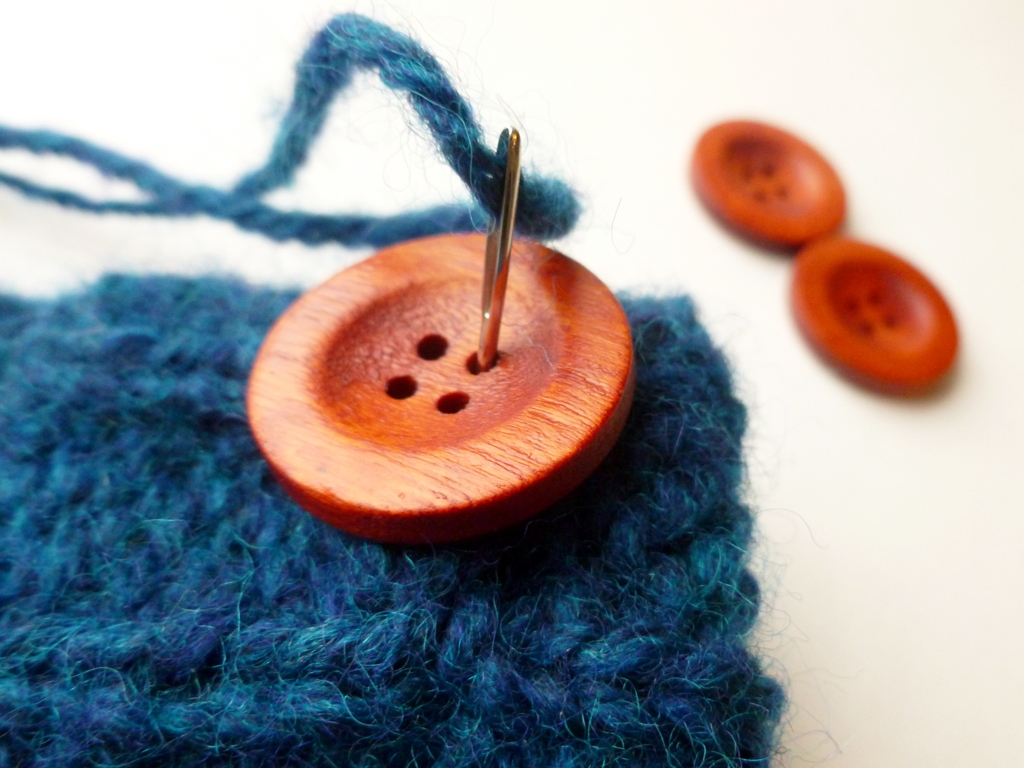
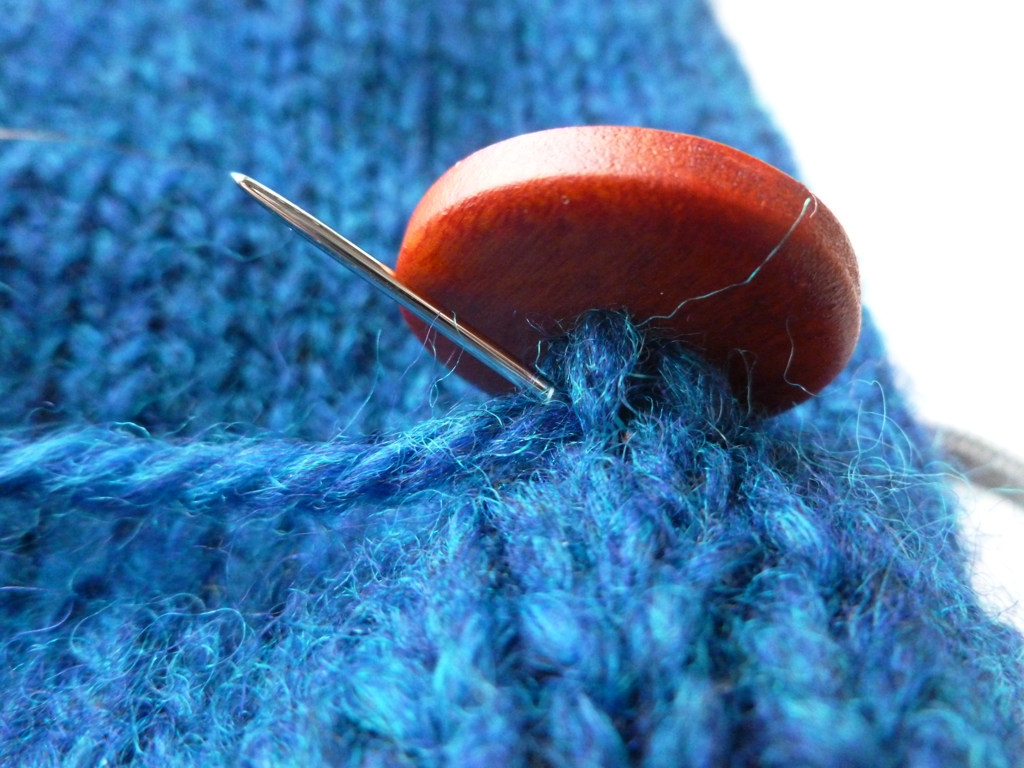
2.  Decide where the button will go and push the threaded needle through the button and fabric.

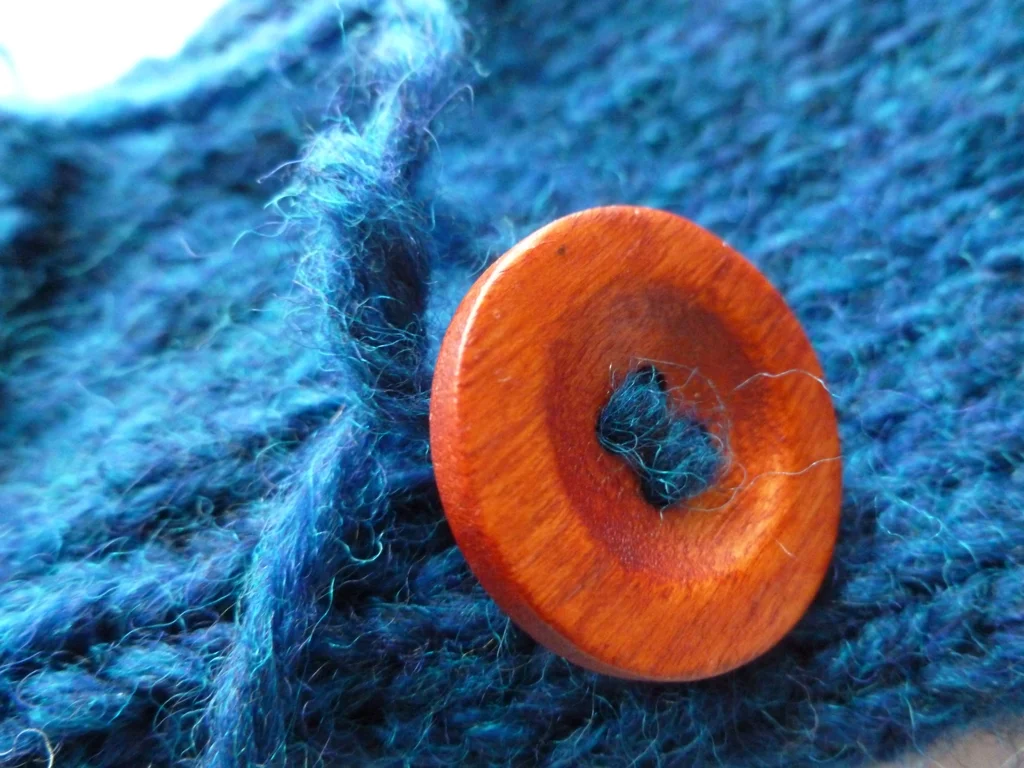
3. Sew through all the buttons holes, into the fabric, and finish with both yarn ends on the wrong side of the piece.

How to Sew on a Button with Handspun Yarn | withwool.com

4. Pull both ends through the fabric underneath the button but do not go through the button holes again.

How to Sew on a Button with Handspun Yarn | withwool.com

5. With the ends, tie a double knot and trim off the extra yarn. 

6. Repeat as necessary.

How to Sew on a Button with Handspun Yarn | withwool.com

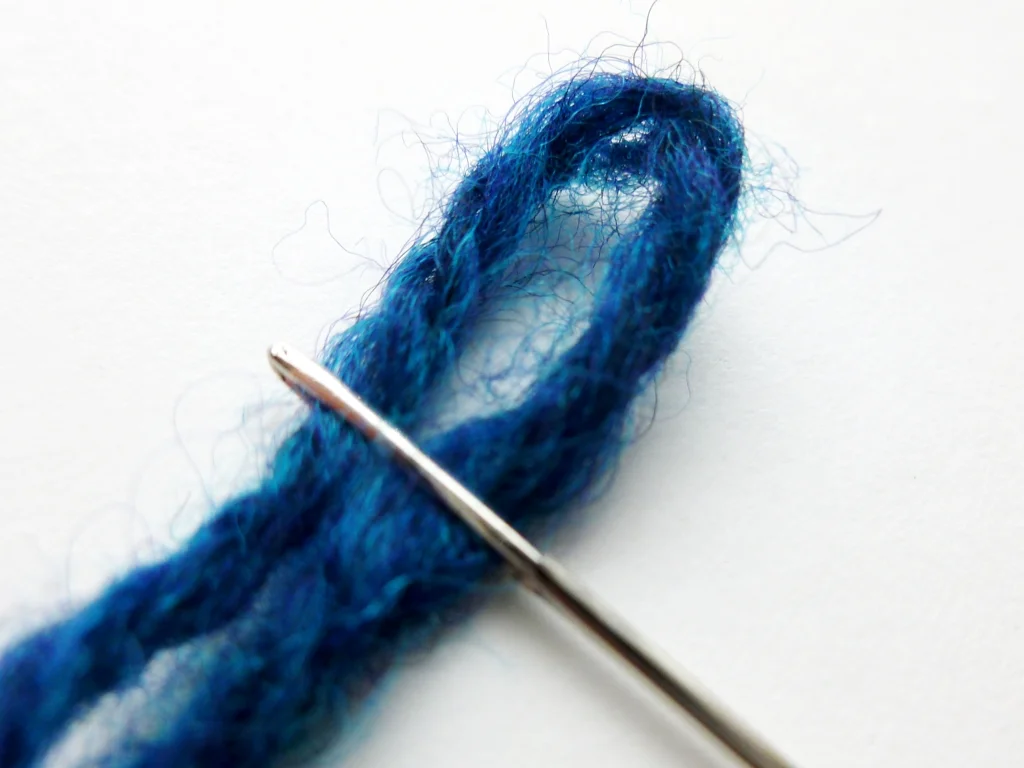
If you’re having trouble threading the yarn through the tapestry needle, fold the yarn in half to form a loop. Tightly hold the top of the loop and push it through the eye of the needle. 

How to Sew on a Button with Handspun Yarn | withwool.com

Button Back Mitts

SnowyLeaves.jpg

Wednesday night, I heard rumors of approaching snow and was quite skeptical. I’ve heard these tales before but this one actually turned out to be true. When I looked out the window Thursday morning, snow was falling at a lovely diagonal. The flakes were so heavy that they didn’t land. They plopped. Dry snow this was not. Still, it’s snow and I took the opportunity to get some photos of knitwear in it’s natural environment.

ButtonBackMitts2.jpg

Button Back Mitts by Cosette Cornelius-Bates

Needles: US 7 (4.5 mm) 

Dates: December 29, 2012 - January 17, 2013

@Ravelry

This is another pattern that’s been sitting in the queue for ages. I finally decided to cast on for them the last time it got cold and didn’t have anything wooly or long enough to cover my fingers. Putting these mitts on instantaneously warms my hands. I’d like to think that it’s because I’m using my own wonderful 3-ply handspun (it debuted as the sea a few months back) but it’s probably just the thicker than normal layer of wool. Either way, still great. 

The mitts are also extra special because this is the first time I’ve really knit with my own handspun. To be honest, I wasn’t sure what to expect. I worried about the gauge. I worried about the stitches being too open where the yarn was thin. I worried about the stitches being too bulky and bulging where the yarn was thick. I worried about running out of yarn since this was the only skein I had. Eventually, I just put those anxieties on the shelf and knit a swatch. I picked the needle size that gave me a nice fabric and got to work.  I kept an eye out for problems and tried on the mitts frequently. Know what I found? Perfectly good yarn that knit up evenly and at a consistent gauge. There were no open spots or bulging stitches. There were no breaks. There was just a good, solid yarn that I would love to knit with again. Handspun, I’m officially and unapologetically in love.

ButtonBackMitts1.jpg

Back to the mitts. The fact that I could knit them long enough to cover my fingers and fold back the extra fabric when it wasn’t needed is what made me queue these mitts to begin with. Cute buttons don’t hurt either. To get the best coverage and the most out of the yarn, I knit the mitts from the fingers down and completely reversed the pattern. Used the same numbers though. 

While I was photographing the mitts, the snow was already starting to melt and turn to slush. See you next time, snow. I’ll be waiting with handspun mitts.

Fili & Kili

Mousie1.jpg

Internet, meet Fili the Mouse. He moved in rather recently and has become my new desk buddy. I’ve since learned that he likes Hawaiian pizza, zombie movies, and long books. He’s also quite fond of knitting and the occasional Sci-Fi reference. I think we’re going to get along just fine.

Mousie2.jpg

One of his habits is storing things away in his pot and rummaging around for them later. That pot must be larger on the inside than the outside because I’ve seen him pull out huge wheels of cheese, boxes of crackers, and then pull out  numerous skeins of handspun yarn. Really have to find out who makes his pots.

Mousie3.jpg

This is is Fili’s friend, Kili. Kili doesn’t have a beard or even a mustache but greatly admires them both. The pair likes to go on adventures though they’re generally home before dark. I’m pretty sure they’re saving up for backpacks and a good camp stove for a journey to Lonely Mountain. Hope they don’t run into any trolls and keep an eye out for dragons.

Mousie4.jpg

Fili’s pattern and yarn related details can be found here.

Double Meow

Kitties6.jpg

Now that both of these frisky felines have gone to their new homes, I can finally introduce them to you. First up is the daring Ninja Cat with his glowing green eyes and stealthy paws. Second, is the striped and inquisitive Bumblebee. It was hard to let them go since they both looked so cute lounging on the furniture.

Bumblebee.jpg

I knit them both with the same yarns, the same needle, and from the same heavily-modified pattern. The only difference was that I made Bumblebee with stripes. Even though I’ve been knitting for years,  I still find it amazing how small changes can drastically affect the finished object. Ninja Cat grew to be short and round while Bumblebee turned out tall and narrow. Both are stuffed with a few pebbles at the bottom to help them sit up. See the pattern, yarns, needle, and modifications on the public Ravelry page.

BumblebeeAndNinja.jpg

One of the neighborhood cats stopped by for a visit and just had to check out the newcomers. After the initial stare down, Ninja Cat and Bumblebee were deemed worthy of her attention. Then she had a fine time knocking them over. They mostly landed on their feet.

Kitties1.jpg

Another Year, Another Blanket

NormaWIP1.jpg

I love knitting blankets. I love casting on a few stitches at the center and slowly multiplying them to hundreds upon hundreds of stitches at the border. I love watching blankets grow from the size of a hat to something I could snuggle up under. So, as a Christmas gift to myself, I took a swan dive into the stash and came up with 4 skeins of Lion Brand Fishermen’s Wool for the Norma Blanket. The pattern had been tempting me since it was released and seeing a friend’s finished blanket pushed me over the edge. 

I’ve been adding rows every few days and the lacy goodness is slowly growing. It’s bigger than the crown of a hat but not large enough to cover my lap or fill up a whole circular needle. I’m in no hurry though and completely enjoying this bit of selfish knitting. I’ll be back to knitting things for others soon enough. 

Anyone else enjoying a break from knitting for others?

Small Knitting

I took a slightly different approach to gift knitting this year. The list was shorter. The gifts were smaller. The last minute requests were filed away for a later date. Not rushing to KNIT ALL THE THINGS saved my bacon this year. Plus, not every gift I give has to be something I knitted. I had my list and, aside from some mid-game additions, stuck to it. I wish I could say I started early too but that didn’t happen. I just went small and that’s worth celebrating.

NanoCosy.jpg

Definitely the tiniest thing I knit was a cosy for my Dad’s iPod. It’s a previous generation and there was next to no chance of finding a case for it. A few quick sketches and 13.6 yards of Knit Picks Comfy Sport later, the case was made.

WashedUp2.jpg

Washcloths made an appearance this year too. The cream cloth is Grandmother’s Favorite in Knit Picks Dishie. I increased to 50 sts before starting the decreases to compensate for the smaller gauge.  The purple cloth is All Washed Up by Jill Arnush in Sugar’n Cream (Country Mauve). I can’t wait to knit the pattern for myself in kitchen towel size. It’s easy, memorizable, and reversible. What’s not to like?

Also on the small list: the annual ornament, two ribbed hats, and two not yet mentioned goodies. I’m not sure if I go small again next year or just start early. What I do know is that I’m not loathing the gift knitting or working on IOU’s which are both good things.

Cheers!

House2012-1.jpg

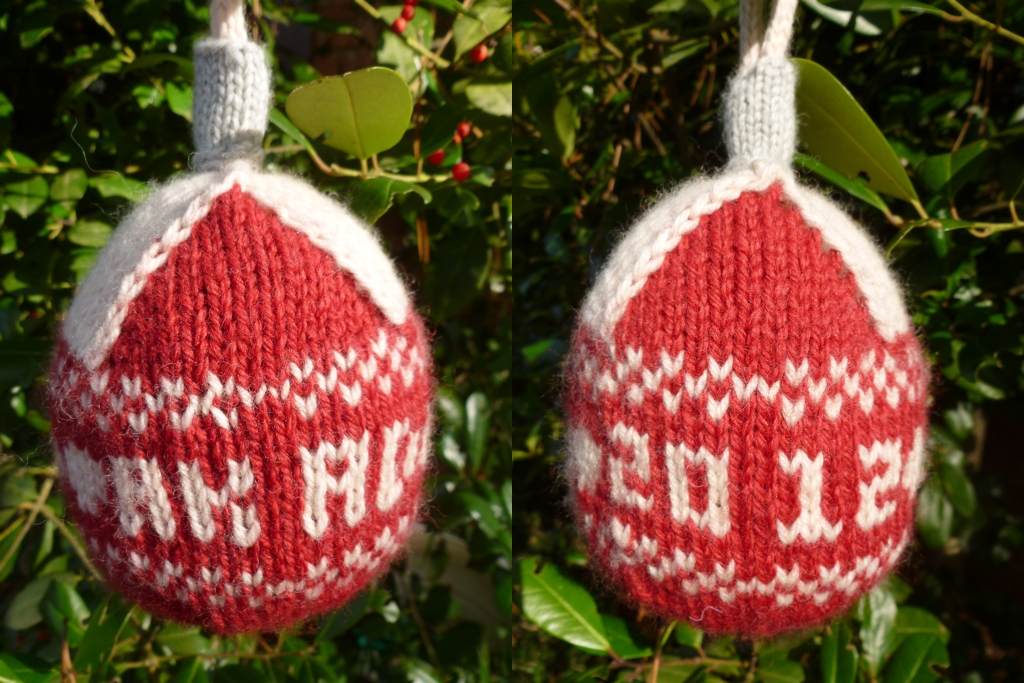
I cut things a little close this year but the annual ornament tradition continues. 2009 saw a stocking, 2010 had mittens, and 2011 got a stocking hat. 2012 gets a cuddly and portly house complete with doors, windows, our initials, the year, and a smoking chimney. The ornament has a high profile spot on the tree and makes me smile every time I walk past. 

I hope you’re enjoying the holidays with lots of food, good company, and piles of finished gifts. Cheers!

House2012-2.jpg

Done

MousieYarn.jpg

Something amazing has happened. All of my Christmas knitting, at least all the stuff I had to make for other people, is finished. In the 6 years since I learned to knit, this is the first time I haven’t had to give out IOU’s or show off stitches still on the needles. Bonus, today isn’t even the end of the world.

To celebrate I’m giving in to the urge to cast on something fun for myself and completely without a deadline. Over a year ago I bought a kit to make Mousie by Ysolda Teague and it’s been sitting in my stash until today. I’ve got grand weekend plans of doing as little as possible, knitting a cute mouse, and enjoying good company. 

If you’re still in the throes of holiday knitting, I wish you speedy needles, tangle-free yarn, and errata free patterns. Good luck. I’m cheering for you.  

Lists = Good

SquaredHats1.jpg

My love for lists is no secret. To-do lists, grocery lists, and check lists have all served me well over the years. Now that there’s only a week until Christmas, the handy list is keeping me sane. This weekend, I was able to cross 3 things off the to-make list. Awesome. This great and powerful list also tells me there’s only 3 things left to make which is great since the list seems so much longer in my head. 

Another thing that’s keeping me sane on the knitting front is ignoring all those last minute requests. I’m just filing them away as future gift ideas and not worrying about them in the slightest.  Less stress and more sleep that way.

SquaredHats2.jpg

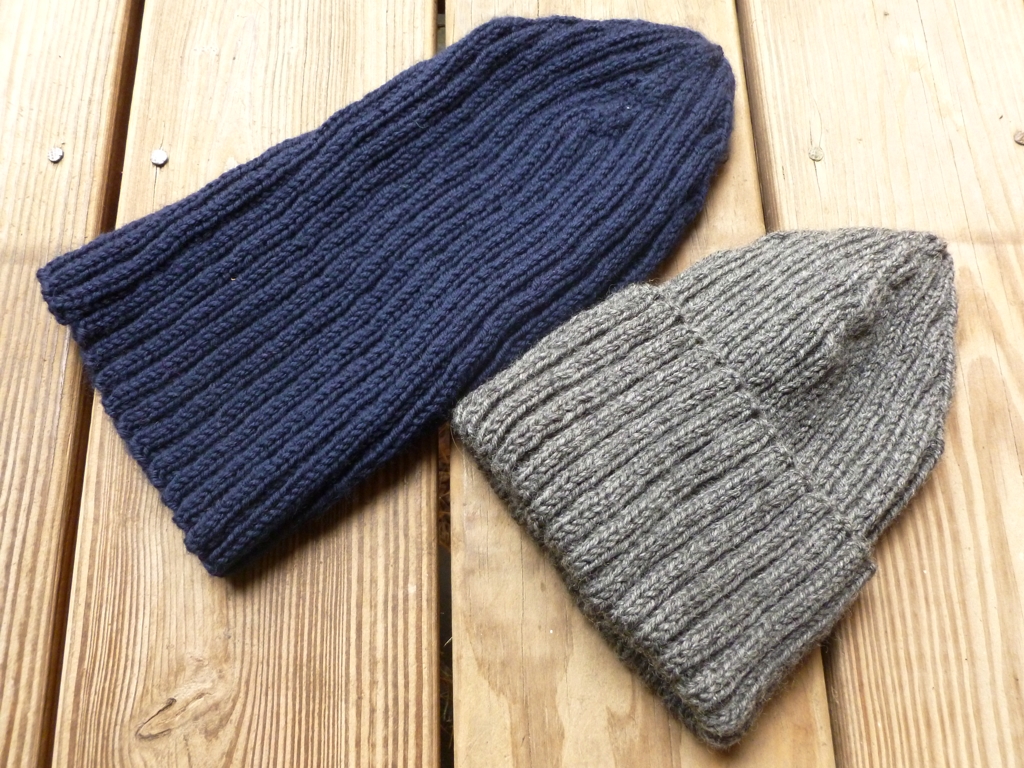
Also keeping the stress down is knowing how much I’ve already accomplished. These 2 hats were added to the list late in the game but finished with time to spare. Never underestimate the strength of simple hats, nice yarn, and manly colors. Add in some entertaining movies to stave off boredom and you’re good to go. 

Pattern: Squared Away Ribbed Watch Cap by Oftroy

Yarn: Cascade 220 Superwash - Grey (900) and Navy (854)

Needles: US 6 (4 mm)

Dates: Dec 5 - 16, 2012

@Ravelry

This is the second and third time I’ve knit this pattern and seems to be my default guy hat. It’s simple but the squared decreases add a nice touch. It’s good travel knitting and good tv knitting which is great since 9” of ribbing gets tiresome pretty quickly. Totally worth it though.

SquaredHats3.jpg

Pattern: Keep It Simple Hat

KISHat5.jpg

Another Thanksgiving has passed and I hope you had a great day even if it was just another Thursday. Now, Black Friday is upon us. As someone who has worked retail on this frenetic day, there is no way that I am venturing anywhere near a mall or major shopping center today. I might not even leave the house which sounds like a great idea to me. While I’m here, have a hat...pattern.

KISHat6.jpg

The Keep It Simple (KIS) Hat is a slouchy hat with a garter brim and simple Fair Isle stripes. It’s meant to be a match for the Keep It Simple Mitts which I designed way back in November 2010. I can’t believe it’s taken me 2 years complete the set. This hat follows all the guidelines I set for those mitts: a simple pattern in worsted weight yarn, a little color work to keep things interesting, a nice use for all those leftover bits, and a quick, attractive knit. I knit the larger size in just 3 days.

KISHat2.jpg

The first pair of mitts, I knit as a gift but this first hat is all mine. I’ve already put it to good use on a few  cold, windy days. Thanks to all the different colors, it’s a great match to all of my coats and a large percentage of my hoodies. I love the versatility.

KISHat3.jpg

The Keep It Simple Hat

Worsted Weight Yarn; Main Color(140, 160 yds), Contrast Color (9, 12 yds) per stripe

Shown in: 

Valley Yarns Stockbridge (Main); (Contrast) Patons Classic Wool, Knit Picks Swish, and Knit Picks Merino Style

Sizes: Small (20”) and Medium (22”)

Needles: US 7 (4.5 mm) 36" circular for Magic Loop or Double Points & 16” Circular

Gauge: 20 sts = 4” in stockinette

Download

@Ravelry

KISHat7.jpg

The Denver Socks

SocksWIP1.jpg

Can I still call this pair ‘The Denver Socks’ even if I only knit on them for a few minutes in the hotel and waiting at the bus stops? When I cast on for these socks before leaving home, I thought I’d be knitting on the plane, at cute cafes, and generally killing time between awesome. Turns out, 6:15 AM flights are not conducive to knitting nor are large, flying sardine cans with no elbow room. Ended up just reading a book, The Night Circus, on the flight back. At least, I didn’t have any problems getting circular needles on a plane at either airport.

I’m not disappointed by the lack of sock knitting, or any kind of knitting, while I was on the trip. 4 days isn’t a much time as you would think and I was busy filling it up with walking, museums, shopping, food, an aquarium, and general explorations to notice much. I wanted to experience a new place and all the sights and sounds that entails. I could knit at home after all. Now that I am home and back to my usual routine, the socks are steadily growing. I’m keeping it simple with some 3x2 ribbing and a pair of afterthought heels. I’m still calling them ‘The Denver Socks’.  

Pattern: Slouchy Babe

SlouchyBabe7.jpg

Things started out simply enough. My mom was going to her niece’s baby shower and requested a cute baby hat. But only if I had one in stock. I didn’t and decided to remedy the situation promptly. So, I started perusing Ravelry with a few ideas in mind: simple, slouchy, eyelets, and baby sized. There was nothing quite like I wanted so out came the sketchbook, the calculator, the needles, and the yarn. After more swatching, ripping, and pages of notes than I’d like to admit, I had a simple, slouchy, baby sized hat with eyelets. Knit from the top-down too.

SlouchyBabe3.jpg

Mom headed off to the baby shower, hat in hand, a few days later and I kept knitting. Soon there was another baby hat, a toddler hat, a kid hat, and an adult sized hat because I wanted one too. I wore it to the breast cancer 5k, hiking in the woods, all around town, and even took it to Denver with me. It’s warm, it’s comfy, and it looks good. What’s not to love?

SlouchyBabe6.jpg

Slouchy Babe

Sizes: 0-6 mo (16”), 6-18 mo (18.5”), 18-4 yrs, 4 yrs & up (20”) 

Worsted Weight Yarn (60, 75, 100, 130 yds)

Shown in Berroco Vintage and Berroco Ultra Alpaca

Gauge: 21 sts = 4” in eyelet pattern

US 6 (4 mm) needles

download  |  @ravelry

SlouchyBabe4.jpg