The Mighty Raven Queen Mitts

Two grey and red fingerless mitts laying next to each other to show the front and back of the pattern.

“Ya know, the photos really didn’t do these mitts justice.”

That was the paraphrased text I got from my friend after she unwrapped these mitts, and I am inclined to agree. She knew that I making these for her so I kept her updated with progress pics. A finished cuff there, half a raven over here, and so on. I didn’t send her any photos after I blocked the mitts though so I wouldn’t spoil the final reveal. Still, they are so great to see in person and wear too. I had to try them on, of course, and make sure my floats weren’t too tight. Yeah, that’s the reason. :)

Two red fingerless mitts covered in grey raven color work.

I had a long list of Christmas knits that I wanted to make, but kept cutting it down as time ran out. I finally decided what was left would be Happy 2021 gifts instead since I’d have to put everything in the mail during massive shipping delays anyway. These mitts were one of the few projects that made the cut. Pretty sure the impressive and fun color work is the reason. I stayed up way too late many a night just to do one more row. Oh! And one extra bonus is that this pattern finally pushed me to understand how m1 increases work. Lifted increases are still my favorite, but I’ll keep the m1 in mind for color work.

Close-up of the inside of the Raven Queen mitts showing gray floats of yarn secured by red stitches. The other mitt right side out is behind.

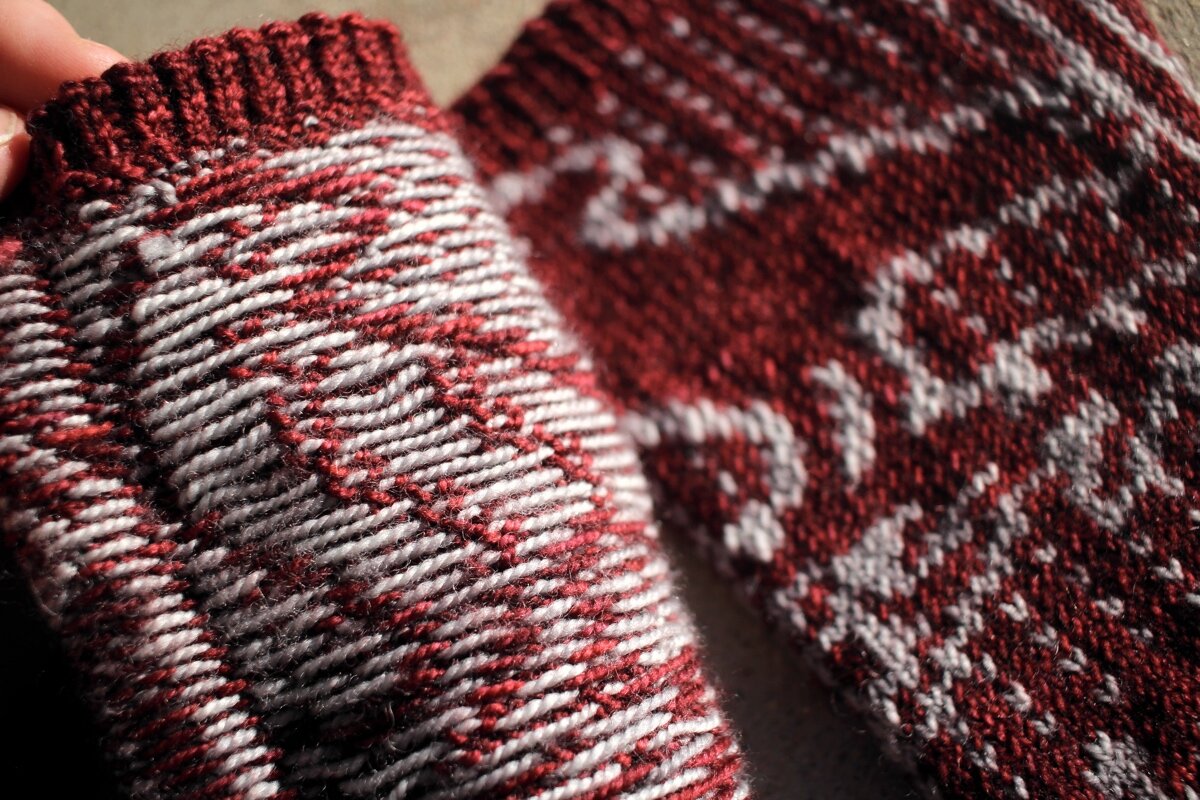
And here are the floats since no post about finished color work is complete without a photo of the back side. There are a few sections where the floats are pretty long so I trapped them about every 8-10 stitches which worked really well. They didn’t catch my fingers when I tried on the mitts at all.

Looking at these photos makes me want to cast on for my own pair right now. I even have the yarn - a variegated charcoal and a golden yellow - wound and ready to go. Now if only I could find energy to start and the brain power to follow color work charts.

The Specs:

Pattern: Raven Queen by Jacquline Rivera (Ravelry Link)

Yarn: Knit Picks Hawthorne Fingering Kettle Dye - 75 yds slate and 147 yds Hood River

Needles: 2.25 mm circulars for ribbing and 2.5 mm circulars for color work

Dates: December 7 - 20, 2020

Ravelry Page

Sideways Swatching

I don’t always swatch for hats which means I sometimes end up ripping out the first few inches because the hat is comically too big. It’s not a big deal because I know it’s an easy fix to rip out and start over with a few less stitches. The hat I’m knitting this time though is a little different. Instead of working in the round from the bottom up, Cattywampus is worked sideways, on the bias, with short rows. Ripping out because it’s too big or too tall is not an easy task. You better believe I swatched.

A close up view of a red, white, and black knitted swatch soaking in the sink.Sideways Swatching || withwool.com#knitswatch #darkmatterknits

The reason for working side-to-side is that I’m making a hat that resembles the flag of Trinidad and Tobago for a friend. I’m not keen on working intarsia, especially intarsia with cotton/linen blends, and working sideways was the easiest way to pull off the diagonal stripes. I worked two sections of the short row crown shaping with all three colors. My gauge was right on the money, and I’m really hoping the swatch wasn’t lying to me.

Red, white, and black swatch dry with ends hanging out.Sideways Swatching || withwool.com#knitswatch #darkmatterknits

The other reason I swatched was to see if the colors would bleed. I only have enough yarn to make one hat and it would be really aggravating if the red and black dye bled on the white stripes. After 20+ minutes in a warm soak with Eucalan, the water was still clear without the faintest tint of red. The problem came when I squeezed water out of the swatch. You can just see the the barest pits of pink where the red and white yarn got squished together. Hmmm…

My hope is that if I squeeze out the water in a different way that the colors won’t bleed. Maybe that’s just wishful thinking. Do you have any tips or recommendations for soap that would stop the excess dye in its tracks?

A partially knit hat in red and white with short row crown shaping and a provisional cast on.Sideways Swatching || withwool.com#knitswatch #darkmatterknits

I did start the hat, and worked several repeats. I was almost done with the black stripe that I added after taking this photo. Yarns had been cut and most of the ends woven in. Then I noticed a rather aggravating issue. The short rows slope in the opposite direction of the flag’s diagonal stripes. The only fix is ripping out, reworking the pattern to slope in the opposite direction, and casting on again. Ugh. Looks like I get to restart this hat despite my best efforts.

Yarn, Knitting, and #The100DayProject

#The100DayProject is helping me feel like myself and remember what I like so much about yarn. | withwool.com

#The100DayProject, a project dedicated to 100 days of whatever you choose, kicked off earlier this month, and I decided to join last minute. I’ve tackled this project in previous years with the goals of daily art, and spinning. For this year’s project, I wasn’t sure what I wanted to commit 100 days to. All I knew was that I was so bored of starring at my phone when I plopped on the couch at the end of the day after putting the Mini to bed. I wanted to do something or make something instead of endlessly scrolling through whatever or playing another game for the Nth time. So there was my project. My goal for 100 days was to put down my phone and make something. It’s been an interesting and fun change of pace. I haven’t done a great job of posting my daily progress online (mainly because it’s already after 11PM when I’m done), but I have put down my phone to make tasty desserts, write tutorials, take photos, pick out buttons, and knit lots.

#The100DayProject is helping me feel like myself and remember what I like so much about yarn. | withwool.com

#The100DayProject might be bringing back my knitting mojo. I returned to a pair of floundering socks for the Bearded One. I finished a pair of slippers, and now just need to sew on 12 buttons. The main project that I’ve devoted the past few days to is a new sweater for the Mini. She’s almost outgrown the first sweater I made her, and I want something she can wear through the Summer and into Fall. All of my perusing through Ravelry for baby stuff while I was still pregnant left me with lots of options to choose from. I picked out three sweaters and first up is Marigold Fields by Taiga Hilliard I had the yarn and the pattern already, but the 100 Day Project gave me the kick I needed to actually start. Casting on turned out to be harder than expected because I couldn’t get a fabric I liked at the required gauge. So I came back the next day to figure out how to make the yarn and pattern work together.

#The100DayProject is helping me feel like myself and remember what I like so much about yarn. | withwool.com

And here we are now. The lace yoke is finished. The arm holes are bound off. My mods went off without a hitch. Now I’m zooming through the body with 3” left before the bottom edge. I’m making the 2T size which will probably be a bit big for her right now, but should hopefully fit her for a long time.

I’m glad I committed to #The100DayProject after taking a break from it last year. It’s helping me feel like my old self and remember what I like so much about yarn. Anyone else tackling the Project with me?

A New Hat For Winter

It’s still warm around here, but I know winter is coming. New red hat to the rescue! | withwool.com

Ever since figuring out that most of my hand knit hats are green, I decided to branch out. First I knit myself a marled Sockhead hat which turned out to be the perfect slouchy hat for snow. Next, I wanted something lacy, maybe with cables, and still slouchy. Slouchy hats are my favorite kind of hat after all. I went digging through my Ravelry queue and found just what I was looking for, the Regina Hat by Alex Tinsley. The pattern calls for fingering weight yarn. I kept digging through the green stash until I found a skein of Knit Picks Hawthorne in Picnic red. I don’t knit a lot of things for myself out of red so this was an added bonus.

It’s still warm around here, but I know winter is coming. New red hat to the rescue! | withwool.com

I decided to be a through knitter and work a swatch before I cast on for the real thing. I had to do down 2 needle sizes to get a nice fabric which meant a different gauge. Based on my swatches, I figured out I’d need to add 2 more repeats to get the right fit. The ribbing turned out way too big, like ‘could wear this hat at the same time as someone else’ too big. After a break, I ripped out the hat and started over with the original stitch count. But I still needed that slouch and to compensate for un-stretchy cables. After finishing the ribbing, I knit one round plain and increased all the stitches I’d need for the body. That little trick worked perfectly. I got the fit and fabric I wanted without losing what I loved about the pattern. 

The rest of the hat was smooth sailing since I didn’t have to make any other modifications. I don’t knit a lot of lace or cables and it was a nice change of pace.

Now that this hat is done and blocked, I’ve got a nice little pile of new knits ready for Winter. It’s holiday knitting time already, but I’m still thinking about starting another hat for myself just because. Maybe the Owl in the Thicket Hat? Or maybe I should make a pair of mitts just to round out the set?  Should probably just get started on the gift knitting though. We’ll see. :D  

It’s still warm around here, but I know winter is coming. New red hat to the rescue! | withwool.com

The Specs:

Pattern: Regina by Alex Tinsley

Yarn: 239 yds Knit Picks Hawthorne - Picnic 

Needles: 2.5 mm (for ribbing) and 3.25 mm (for lace) circular needles

Dates: May 8 - August 10, 2017

@Ravelry

Second Cast On's The Charm

It never fails. No matter how diligently or how much I swatch for a new hat, the first attempt is always too big. Usually works out on the second try though. | withwool.com

It never fails. No matter how diligently or how much I swatch for a new hat, the first time attempt is always too big. Even when I throw in the 10 - 20% amount of negative ease that I like in my hats, too big. I added an extra repeat to the Regina Hat and knit an inch of ribbing before trying it on. Here’s the ribbing with a copy of Yarnitecture for scale. Way too big.

It never fails. No matter how diligently or how much I swatch for a new hat, the first attempt is always too big. Usually works out on the second try though. | withwool.com

I put the hat out of sight until I felt like ripping out and starting all over again. That turned out to be a few days before I needed some simple knitting for a day trip. Casting on 100+ stitches at home sounded a lot better than frogging and casting on 100+ stitches on a bumpy road. So I grudgingly got to work. 

It never fails. No matter how diligently or how much I swatch for a new hat, the first attempt is always too big. Usually works out on the second try though. | withwool.com

Here’s a tip that’s saved me a lot of frustration over the years. Whenever I have to cast on a large number of stitches, say more than 80, I use stitch markers. It’s easy to count to 20, place a marker, and start another group of 20 stitches, than count more than 100+ stitches at once. The number of stitches in a repeat is a nice place to drop a marker too. Those markers mean that interruptions aren’t as big a deal. Also, you don’t have to question if that was the 82nd stitch or the 83rd before giving up and starting from 0 just to be sure. This trick is just one of the reasons I have so many markers.  

I got a few rounds on the needles and packed it into my purse with the pattern and my usual notions. Travel knitting ready and waiting to go. 

It never fails. No matter how diligently or how much I swatch for a new hat, the first attempt is always too big. | withwool.com

Ended up with a nice chunk of time in the car and another inch of 1x1 rib. The hat actually seems to fit this time! Thankfully, the second time is usually the charm. I didn’t spend the entire time looking at my hands which is why I keep my travel knitting simple. I want to enjoy the sights and the adventure, not be stuck looking at my knitting counting increases. Ended up seeing a lot of beautiful landscapes, incredible views, and chubby marmots at Rocky Mountain National Park.  

It never fails. No matter how diligently or how much I swatch for a new hat, the first attempt is always too big. | withwool.com

FO: Meadow Multi Socks

Toe-up socks with afterthought cuffs make perfect travel knitting. | withwool.com

It’s March and it feels a little strange to be thinking about holiday parties right now, but that’s when I cast on for these socks. I needed something to keep my hands busy at a potluck last December and a pair of toe-up socks were just the thing. Then the pair was my constant companion, even if I didn’t always take them out of my purse. They flew cross-country and back, went to movies, binge watched tv, and went skiing with me too. I’ve got a lot of memories knit into these socks even if they are just a simple 2x2 rib.    

Toe-up socks with afterthought cuffs make perfect travel knitting. | withwool.com

The pattern is my own default toe-up vanilla sock with an afterthought leg. Ever since trying Cat Bordhi’s Houdini Socks pattern, I really prefer it over working an afterthought heel. When you bind off the cuff, you’ve got a finished sock - aside from weaving in ends - that’s ready to wear. That beats having to come back and add a heel any day of the week. 

Toe-up socks with afterthought cuffs make perfect travel knitting. | withwool.com

The weather’s been on the weird side for the past few weeks. It snowed for a couple of days, and by the end of the week temps were in the 70’s. I didn’t need a jacket, let alone a pair of wool socks. And now it’s chilly again. Weird. At least the socks are ready to warm my toes when it does get cold. 

Toe-up socks with afterthought cuffs make perfect travel knitting. | withwool.com

The Specs

Pattern: My Default Toe-Up Sock with an Afterthought Cuff

Yarn: Knit Picks Stroll Multi - Meadow Multi

Needles: 2.25 mm circulars

Dates: December 13, 2016 - February 18, 2017 

@Ravelry

Review: Knit Picks Hawthorne

The Yarn: Hawthorne Fingering Multi 

Company: Knit Picks

Price: $10.99 US


TL;DR: One pair of washed socks later, I’m impressed and will definitely buy Hawthorne again. 

Yarn Weight: Fingering

Knitting Gauge: 7 - 8 sts = 1" on #1 - 3 needles (2.25mm-3.25mm)

Crochet Gauge: 21 – 32 sc = 4'' on B - E hooks (2.25mm-3.5mm)

Yardage/Weight: 357 yds/ 100 g

Suggested Care: Machine Wash Gentle/Tumble Dry Low

A good friend of mine has knit me several comfy pairs of socks and I wanted to knit a pair for her. Even if they have small feet, sock knitters appreciate all the work that goes into a good pair of hand knit socks. I didn’t have anything in my stash that I thought she’d love so I went shopping for a nice skein of sock yarn. I was looking for yarns for other projects on the Knit Picks site and decided look over their sock yarn. One Hawthorne’s colorways, Vancouver, seemed like the perfect choice and, after checking how it knit up on Ravelry, it went in the cart. 

My first impression after carefully cutting open the box was good. The colors were as saturated and true as they appeared on my screen. As for the yarn, it was soft but still seemed strong enough to be made into a pair of socks. The good impression continued when I wound the hank into a ball/cake. I didn’t have to untangle any of the strands and didn’t find any knots or weak spots. The only thing left to do was knit. I cast on for a modified version of the Smokestack socks which you can check out here.

At 357 yards per hank the yardage is on the low side when compared to other put-ups; however, the 2-ply yarn is on the thicker side of fingering weight which is a major bonus for me. Hawthorne is spun to high twist suitable for a sock yarn and held up well to repeated ripping. I couldn’t see or feel any difference between the yarn that I worked with several times and the yarn I’d only knit once. The other bonus of the twist was that it created strong stitch definition. Cables popped and garter ridges stood out. Even with this twist, the yarn isn’t wiry and it didn’t hurt my hands while I was knitting it.

Hawthorne is hand painted and the Vancouver colorway is a combination dark earth tones - green, purple, brown, burgundy - and a bright sky blue. Looking at it directly, the majority of the colors are muted but saturate the yarn. There are no white spots nor muddying between colors. The full color repeat is several feet long while the length of individual colors varies. Thanks to the blended nylon and the smooth tight twist, Hawthorne has a slight luster which really shows up on camera.

Knit Pick’s care instructions say that the yarn can be machine washed on gentle and tumbled dried low. I didn’t machine wash the pair since I didn’t need to do laundry and wanted to save my $3.25 in quarters for another day. The socks got a 30 minute soak in cool water with a bit of unscented Eucalan. I dried them by squishing them, rolling them up in a towel, and stomping on them to get out the last of the excess water. Then I hung them up to dry.  The socks stayed the same size and the colors didn’t bleed at all. 

Since my friend has small feet, I had ~150 yards leftover. I loved working with this yarn so much that I’m going to pair it with a skein of the kettle dyed Hawthorne to make socks for me. The Broken Seed Socks seem like the right pattern. 

Smokestack Socks

I’m pretty sure that hidden away in all the math that is knitting there’s a simple equation which reads: give hand knit socks = get hand knit socks. I’ve gotten a few pairs of comfy, well-fitting socks as gifts from one particular knitting friend, and it was past time I equalized the equation. 

Step 1: Buy sock yarn in her favorite colors. I took a chance on Knit Picks Hawthorne and picked up a skein of the Fingering Multi in the Vancouver colorway.

Step 2: Snoop through her Ravelry queue to find out what she likes in a sock. Cables popped up quite a bit which lead me to pick the Smokestack Socks by Tanis Lavallee. The pattern has been in my queue to knit for myself for awhile but I also picked it because of the cables and how easy it looked to modify the stitch count. Just as important was how the pattern looked with variegated yarn which, thanks to Ravelry, was quick to see.

Step 3: Wind the yarn.

Step 4: Actually knit the socks. This is easier written than it was done because of how many times I ripped out. Not the patterns fault at all; it was all me. The Smokestack Socks are written to be knit from the cuff down, but I worked them toe-up as I knit all of my socks. The first ripping came when I found out how small knitting friend’s feet are. The rest of the sock was smooth sailing asides from the moments I tinked back to add the purl ridges or cross a missed cable. 

The second sock was not as forgiving. I cast on, knit the toe, worked the foot, increased for the gusset, turned the heel, and was working the heel flap when I noticed that it was too long. By almost an inch and there’s no fudging that. I measured and my gauge had increased by 1 row/inch; nothing else changed except the speed I was knitting. That’s what I get for rushing. At least I had the company and sympathy of a few knitting buddies when I ripped all the way back to the toe. Thankfully, my gauge cooperated for the second attempt. 

Step 5: Wash the socks. No problems here.

Step 6: Mail the socks. The package arrived over the weekend and I got a photo of the socks on her feet. Social media is pretty awesome like that. All the ripping and re-knitting was worth it because they’re a perfect fit. #knittingwin The equation is equal, and now I get to knit a pair for myself in green. 

The Specs

Pattern: Smokestack Socks by Tanis Lavallee

Yarn: 204 yds Knit Picks Hawthrone - Vancouver (204 yds)

Needles: 2.25 mm circulars

Dates: April 3 - 21, 2015

Full modificaitons listed @Ravelry