FO: Precipitous Cuffs

The kind of yarn you use matters! I used 2 different yarns to make 2 pairs of Precipitous cuffs on the same needles, and got two wildly different finished projects. - FO: Precipitous Cuffs | withwool.com

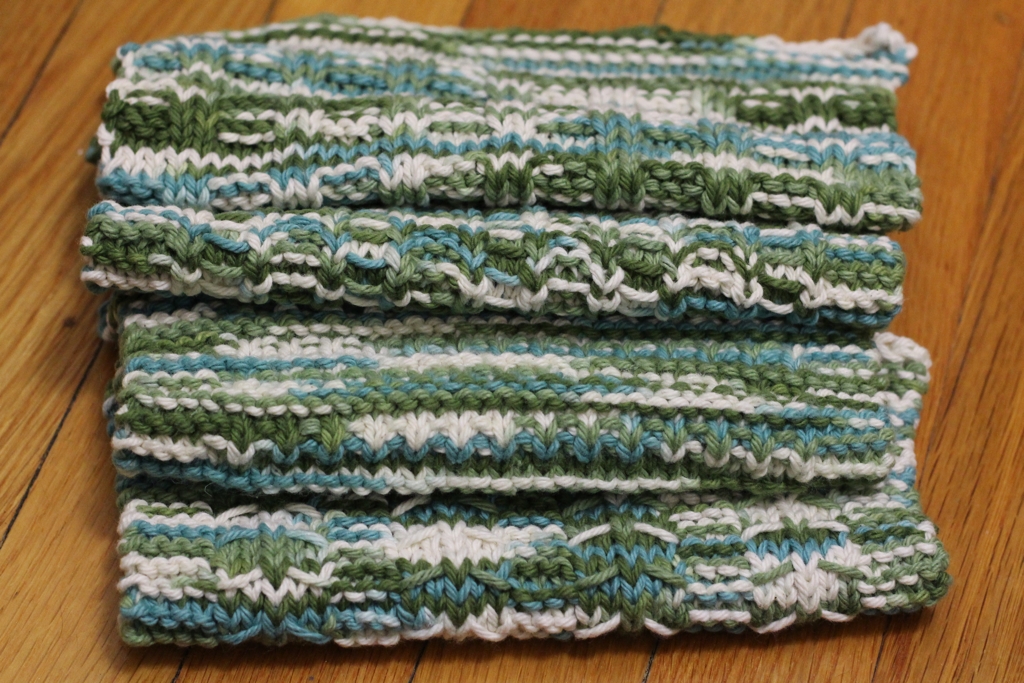
I’ve been a little lazy updating Ravelry with project details and recent stash enhancements. Part of the plan for this week is to photograph fiber and update my stash catalog. I’m bribing myself into doing the work with knitting on a fun new project which is working pretty well.  As I was scrolling through my project page, I realized that I’ve never talked about the last few things I made as gifts in 2015. That’s the problem with secret knitting - sometimes it easy to forget to talk about it after it’s been given away and the festivities are over. Fixing that right now. So, here’s the Precipitous Cuffs I knit for my Mom and a friend.  

The kind of yarn you use matters! I used 2 different yarns to make 2 pairs of Precipitous cuffs on the same needles, and got two wildly different finished projects. - FO: Precipitous Cuffs | withwool.com

I had some difficult criteria to match while picking out stuff to knit for gifts. The pattern had to be relatively quick to knit ( I was on a holiday gift knitting deadline); use yarn I already had; and be small enough to pack in a suitcase for the flight to visit my folks. Plus, the recipients had to like it too. Enter Precipitous by Hunter Hammersen. I had a dark charcoal yarn which would be perfect. Partway through this first pair, I realized my Mom would like a pair too. While these weren’t the hardest things to knit from almost black yarn, I was glad to make the second pair in golden yellow. They were both pretty quick to knit too even with all the twisted stitches.

The kind of yarn you use matters! I used 2 different yarns to make 2 pairs of Precipitous cuffs on the same needles, and got two wildly different finished projects. - FO: Precipitous Cuffs | withwool.com
My thanks to @HunterHammersen for sharing this blocking trick. Instead of graph paper, I made a template to get the 5 points evenly spaced and sized. - FO: Precipitous Cuffs | withwool.com

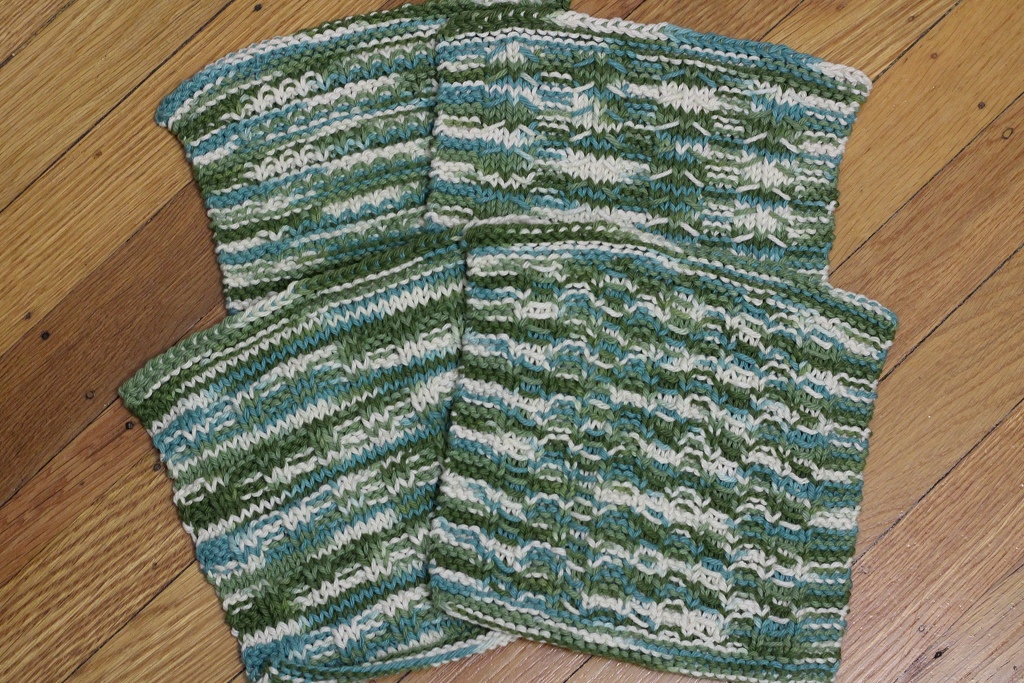
After I’d bound off, I knew blocking was a necessity. There was no way the points would be distinct or that the twisted stitches would pop otherwise. Plus it would help even out the stitches on the increase rows and ribbing. I wasn’t sure how I was going to block these until I saw this neat trick using bottles and graph paper on Violently Domestic. Finding the bottles was the easy part. The hard part printing the 5 pointed star template so I could block both mitts of a pair to the same size and angles. Thankfully, the ink didn’t bleed onto the yarn during the whole process. 

The kind of yarn you use matters! I used 2 different yarns to make 2 pairs of Precipitous cuffs on the same needles, and got two wildly different finished projects. - FO: Precipitous Cuffs | withwool.com

It is so easy to see the difference yarn choice can make on a project after both pairs were dry. The gold pair is made from Knit Picks Gloss, a merino/silk blend, and the charcoal pair is made form Knitted Wit Gumballs Fingering which is 100% merino. I knit both pairs on the same needles and, aside from a few extra rows on the cuffs of the gold pair, the two pairs are the same. Row gauge and stitch gauge are definitely different. The gold cuffs have a lot more drape because of both the looser gauge and blend of fibers. The charcoal pair has body and memory because they were made from a firmly spun wool yarn at a tighter gauge. When I took the pair off the blocking rig it held it’s shape, and I didn’t knit bullet-proof fabric.

The kind of yarn you use matters! I used 2 different yarns to make 2 pairs of Precipitous cuffs on the same needles, and got two wildly different finished projects. - FO: Precipitous Cuffs | withwool.com

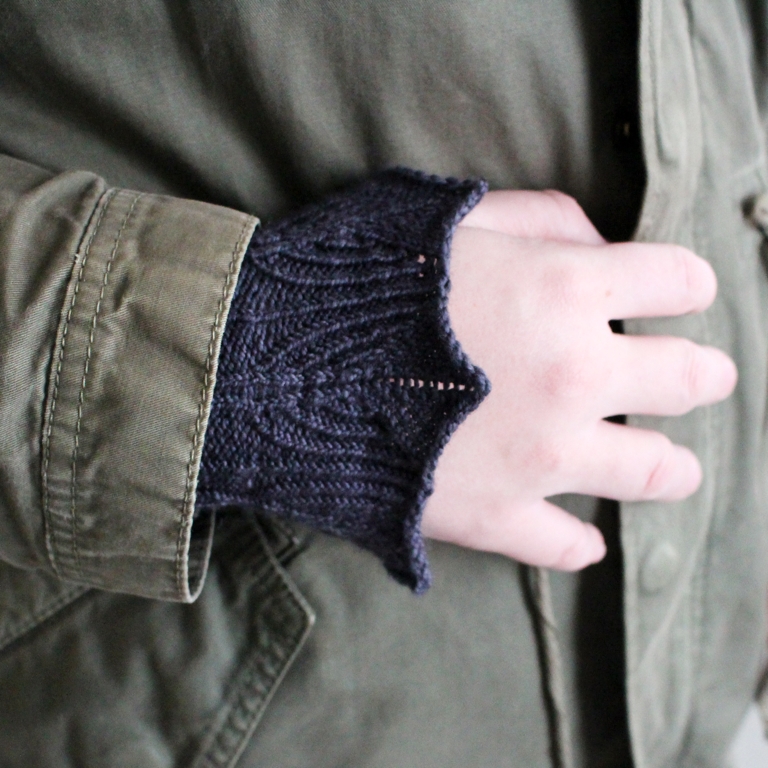
Of course I had to try them to make sure they would fit. They both passed with flying colors, and now I’m tempted to make myself a pair. Not sure if I want drapey cuffs or a no nonsense kind of pair. Either way, the pattern doesn’t use much yardage and I’ve got plenty of sock yarn leftovers. Just need to pick out the right needle size and get to knitting. 

The Specs

Pattern: Precipitous by Hunter Hammersen 

Yarn: Knit Picks Gloss - Honey and Knitted Wit Gumballs Fingering - Carbon

Needles: 2.75 mm and 3.25 mm circulars

Dates: November 15 - December 3, 2015

@Ravelry 

Notes About Spinning Cashmere

My first handspun skeins of cashmere! Cashmere is as soft as everyone says it is, and here's how I turned 2 oz of it into yarn. | Notes About Spinning Cashmere - withwool.com

Brave readers, it’s time for the next installment of adventures in spinning cashmere. In the first entry, I wrote about my attempt at drafting the singles and overcoming the idea that spinning cashmere would be as hard as everyone made it sound. At the time, I was working on the second single with the idea that the true test of whether or not I could spin cashmere would be in the plying. If the singles fell apart every couple of feet, then I’d failed. If the singles stayed together, then I could actually spin cashmere without screwing it up. 

One mama skein and one baby skein of plied cashmere ready to come off the bobbins. Cashmere is as soft as everyone says it is, and here's how I turned 2 oz of it into yarn. | Notes About Spinning Cashmere - withwool.com

Did the singles pass the plying test? If you haven’t already guessed from all the pictures, yes! Seeing all the plied yarn on the bobbins was a relief because I wasn’t sure I was going to pull it off until they were done. There were a few times with the singles pulled apart on me, but I didn’t need all the fingers on one hand to count them. Whew. 

A little uneven and limp, the yarn is ready to be finished with a good soak. Cashmere is as soft as everyone says it is, and here's how I turned 2 oz of it into yarn. | Notes About Spinning Cashmere - withwool.com

The final test came with the finishing. Would the skeins be the lofty, airy yarn I set out to spin? Before the skeins went into the bath, they looked a little limp - plenty of plying twist in them, but limp all the same. Finishing the skeins with a soak and a gentle thwack changed them for the better. The yarn plumped up to a beautiful, airy body and texture. Soft too. Oh, so soft. Of everything I’ve spun, this was the hardest to let go of. If the fiber hadn’t been sent to me to spin and then send back, I probably would have kept the yarn as a pet. Have I mentioned how soft it was? Mmmm…

My first handspun skeins of cashmere! The mama skein is about 240 yrds and mini is about 25 yrds. Cashmere is as soft as everyone says it is, and here's how I turned 2 oz of it into yarn. | Notes About Spinning Cashmere - withwool.com

Enough with the daydreaming, onto the technical details. Now that I know that what I did to spin this cashmere actually works, I can share my notes in good conscience. They still come with the disclaimer that I’m still a newb when it comes to working with this luscious stuff though. 

I didn’t actually read up on how to spin cashmere before I started the singles. My idea to spin cashmere woolen came from a cotton spinning demo with Stephanie Gaustad when she visited the Greater Los Angeles Spinning Guild. (Side note: Fiber guilds are great resources and worth joining.) My biggest takeaway was Gaustad’s comment that people thought spinning cotton, a short staple fiber, was hard was because they tried to spin it the same they they spun grabby, long-stapled fibers. Instead, she recommended woolen spinning because the twist would move into the fiber supply and keep things from falling apart during drafting. 

My first handspun skeins of cashmere! Cashmere is as soft as everyone says it is, and here's how I turned 2 oz of it into yarn. | Notes About Spinning Cashmere - withwool.com

I decided to try this idea with the short, slippery cashmere. So, I used a woolen drafting style and let the twist come into the fiber supply. To keep the twist from locking up the fibers, I set the take up low and used a larger whorl. There’s usually at least good foot and a half between my hands and the wheel’s orifice, so this distance let more twist enter the single before it went on the bobbin. As for plying, I didn’t do anything beyond the ordinary tensioning andbalance checks. 

I did do some research on how to finish cashmere but didn’t turn up much in my cursory internet search. I was working on a deadline, remember. Ended up following my usual steps for finishing a woolen yarn. First, the skeins soaked in cool water with a little Eucalan for about 20 minutes. After the yarn came out of the bath, and I squeezed out as much water as possible first with my hands and then by rolling the yarn up in a towel. I evened out the twist with a few good snaps around my hands before giving the yarn a few gentle thwacks against the shower wall. Gentle is key here since I wanted the plies to open up but not develop a halo. Then I hung them up to dry, and the wait proved to be the hardest part of finishing. The last step, which I heartily recommend, is petting the yarn like it’s an adorable kitten. So soft... 

Made sure to send off the handspun with a tag detailing the weight, WPI, and construction. Cashmere is as soft as everyone says it is, and here's how I turned 2 oz of it into yarn. | Notes About Spinning Cashmere - withwool.com

Fiber: 2 oz cashmere top

Yardage: Mama ~240 yds and Mini ~25 yds

Plies & Weight: 2-ply Sport; Mini skein plied on itself

Start & Finish: November 28 - December 15, 2015

@Ravelry

FO: Non-Felted Slippers and Practical Washcloths

Who knew slippers were so quick and fun to make? I made this pair as a Christmas gift, and now I want to make a pair for me. | FO: Non-Felted Slippers and Practical Washcloths - withwool.com

The Non-Felted Slippers pattern has been in my queue for years, and I finally got the chance to make them. Turns out that slippers are fun to knit. Quick to make too when you use super bulky yarn. I made one other pair but they were essentially socks with soles sewn to the bottom - so these are technically the first pair of slippers I’ve ever made. 

Who knew slippers were so quick and fun to make? I made this pair as a Christmas gift, and now I want to make a pair for me. | FO: Non-Felted Slippers and Practical Washcloths - withwool.com

One of the great things about knitting a pattern that’s been made 2,953+ times is that there are plenty of helpful tips and hints to find. I researched people’s mods to see what was possible and went from there. Definitely didn’t want a seam on the bottom of the foot so I used Judy’s Magic Cast On to start the sole - it’s not just for sock toes - and worked everything except the sole in the round. I made up plenty of time from not having to sew the slipper together even after ripping out the sole twice to get the right size. Full mods and numbers on the slipper’s Ravelry page. 

Who knew slippers were so quick and fun to make? I made this pair as a Christmas gift, and now I want to make a pair for me. | FO: Non-Felted Slippers and Practical Washcloths - withwool.com
Who knew slippers were so quick and fun to make? Sewing on the soles did take a good chunk of time though, but the work was definitely worth it. They gave the slippers structure and a bit of slip resistance. | FO: Non-Felted Slippers and Practi…
Here's what the inside of the slipper looks like after the soles were sewn on. I didn't pull the seams too tight and they blended in well with the sole fabric. | FO: Non-Felted Slippers and Practical Washcloths - withwool.com

The one thing I did underestimate was how long it would take to sew on the soles. I probably could have knit a third slipper in the time it took me to sew on all 4 pieces. At least I didn’t sew the top and bottom together…more than once. Ahem. Anyway, the soles added something special and slip-resistant too. I used the medium size suede Fiber Trends soles which were a good fit for a US 8 slipper. I’ve got a large set stashed away for when I make slippers for myself. 

Who knew slippers were so quick and fun to make? I made this pair as a Christmas gift, and now I want to make a pair for me. | FO: Non-Felted Slippers and Practical Washcloths - withwool.com

Pattern: Non-Felted Slippers by Yuko Nakamura

Yarn: Knit Picks Wool of the Andes Superwash Bulky - 41 yds Fjord Heather and 67 yds Briar Heather

Needles: US 8 (5mm) circs

Dates: November 5 - 27, 2015

@Ravelry

Washcloths are a tried and true gift. Plus, they're a quick knit so you can make a bunch before you get bored. | FO: Non-Felted Slippers and Practical Washcloths - withwool.com

Washcloths are a tried and true gift. Always practical and fun, they’re quick enough that you can makea bunch before you get bored. I usually knit a few of them to giveaway every year. There was a set of 4 on the gift list last year. Each cloth used a different pattern to keep things interesting. I made 2 of my own designs, 1 that’s been in my queue for years, and 1 old favorite. Even though every one is different because of texture or slipped stitches, making them the same color really tied them all together. The washcloths were a big hit so I’m definitely going to knit more sets like this in the future.  

Washcloths are a tried and true gift. Plus, they're a quick knit so you can make a bunch before you get bored. | FO: Non-Felted Slippers and Practical Washcloths - withwool.com

Pattern: Bridges Towel and Laddered Cloth by me; Little Tent Dishcloth by Vaunda Rae Giberson, and All Washed Up by Jill Arnusch

Yarn: Pisgah Yarn Peaches & Creme Ombres - Ivy League (30 - 33 yds per cloth)

Needles: US 6 (4mm) needles

Dates: November 8 - 12, 2015

@Ravelry

Two Bears And A Bunny

Beatrice and Bernard are an inseparable pair that make for quick knit gifts! Cute too. :) | Two Bears And A Bunny - withwool.com

Beatrice and Bernard are an inseparable pair that make for quick knit gifts! Cute too. :) | Two Bears And A Bunny - withwool.com

What do you make for a cute 1-year-old kiddo? A cute bunny and bear, of course. 

Once I decided to make Beatrice and Bernard, they almost seemed to knit themselves. I’ve made the pair before and used a few mods to make them even faster to put together: stuffing them as a go, knitting the arms from the paw up, and grafting the head closed. The only hard part was the making the grafting look nice. Scratch that, I lied. The hard part is sewing on the arms at the same height on both sides. I thought the bunny was almost finished until I got a good look at the arms after sewing them on. One of them was definitely higher than the other which meant I had to unpick the seam and do it again. The second time was the charm fortunately. 

After the pair had arrived in their new home, I got a text that they’d each gotten a kiss when they were unwrapped. Pretty sure that means I won Christmas knitting. :)

Beatrice and Bernard are an inseparable pair that make for quick knit gifts! Cute too. :) | Two Bears And A Bunny - withwool.com

Pattern: Beatrice and Bernard The Inseparable Bunny and Bear by Rebecca Danger

Yarn: 65 yds Knit Picks Wool of the Andes Superwash Bulky

Needles: US 5 (3.75 mm) circulars

Dates: November 24 - 26, 2015

@Ravelry

One adorably Christmas ornament coming up! | Two Bears And A Bunny - withwool.com

I slacked off in 2014, but I have a yearly tradition to make a new ornament for the tree every Christmas. The first ornaments were just an excuse to make cute things to go on the tree, but they’ve grown to tell a story over the years. That’s how I ended up making a stocking covered in palm trees and knitting a color work house among other things. When it came time to make an ornament for 2014, I never really figured out what I wanted to make or how to make it. The idea to knit the extinct California grizzly bear didn’t occur to me until 2015 gift knitting time. Thankfully, making it didn’t take anywhere near as long as it took for me to have the idea. 

Making the bear went quickly even though I essentially knit the pattern twice with the second attempt worked in the round. Then I couldn’t decide on the design for the embroidery. The bear sat to the side while I worked on other Christmas knits and ordered the yarn I wanted to use for the embroidery. Once I had the design sketched out, the final stitching went reasonably quickly even though I redid it a few times to make it neat. So, 2014 finally got its ornament.

As for the 2015 ornament, I have the yarn and an idea. I still have to work out the charts, but it’ll be a nice project for February even if it is a few months late. 

One adorably Christmas ornament coming up! | Two Bears And A Bunny - withwool.com

Pattern: Grizzly Bear Toy by Linda Dawkins

Yarn: 64 yds Knit Picks Gloss Fingering - Doe for the body and Honey for the embroidery

Needles: 2.75 circulars

Dates: November 13 - December 5, 2015

@Ravelry

One knit bear checking out the view. | Two Bears And A Bunny - withwool.com

FO: Crescent Over Lothlorien and The Dewberry Cowl

The Crescent Over Lothlorien Shawl was the first thing I knit from my 2015 holiday gift list. So pleased with how it turned out.  FO: Crescent Over Lothlorien and Dewberry Cowl - withwool.com

I decided to go all out with my gift knitting for Christmas 2015. The list started out small - less than 5 pieces - before growing and growing and growing just a little bit more. When all was said and done, I had knit a shawl, a cowl, a hat, 4 washcloths, a pair of slippers, 2 pairs of wrist cuffs, a bear & bunny duo, and one golden bear. Plus, there was that skein of handspun. This was a pretty ambitious list considering that I skipped holiday gift knitting the previous years. I’m pretty sure the only reason I was able to get everything done was because I’d committed to #yearofmaking, and had built a habit of making something every day. Even a few stitches a day can add up to something really big.

The Crescent Over Lothlorien Shawl was the first thing I knit from my 2015 holiday gift list. So pleased with how it turned out.  FO: Crescent Over Lothlorien and Dewberry Cowl - withwool.com

What do you knit for the lace knitter that loves fantasy and general geekery? Fantasy themed lace, of course! The Crescent Over Lothlorien Shawl fit the bill, and had the added bonus of a reversible stitch pattern. 

I had a few hiccups reading the pattern and had to rip out a few times - once all the way back to the beginning - but the knitting was fairly easy once I figured out the rhythm and quirks of the design. It was also my first time using Dream in Color Smooshy which was lovely. The shawl was also great tv knitting aside from that one time I really messed up the lace pattern. (Note to self: Don’t stay up to 2AM knitting lace. You’re just going to give yourself a headache and a giant time suck the next morning.)

The Crescent Over Lothlorien Shawl was the first thing I knit from my 2015 holiday gift list. So pleased with how it turned out.  FO: Crescent Over Lothlorien and Dewberry Cowl - withwool.com

I’ve said it before and I’m sure I’ll say it again, blocking is magic. Once the shawl was bound off with a ridiculously stretchy decrease bind off, it looked small and crumpled. Even knowing how blocking can transform a piece, I was still nervous that the finished shawl wouldn’t be a worthy gift. I needn't have worried. 

The shawl got a nice long soak before I stretched and pinned it to an inch of its life. Flexible blocking wires made shaping and pulling out the points so much simpler and quicker then working with only pins. Inserting the wires and shaping the shawl still took at least 30 minutes though. When that work was done, instead of a small and crumpled shawl, the crescent was long and delicate. The yarn overs had popped open, the columns were visible, and every leaf was distinct. Whew…

The Crescent Over Lothlorien Shawl was the first thing I knit from my 2015 holiday gift list. So pleased with how it turned out.  FO: Crescent Over Lothlorien and Dewberry Cowl - withwool.com

Pattern: Crescent Over Lothlorien by Cordula Surmann-Schmitt 

Yarn: Dream in Color Smooshy - Icy Reception

Needles: US 4 (3.5mm) circulars

Date: September 12 - October 23, 2015

@Ravelry 

I've wanted to knit the Dewberry Cowl since I first saw it, and it was a perfect pattern for gift knitting. FO: Crescent Over Lothlorien and Dewberry Cowl - withwool.com

The second gift knit was the Dewberry Cowl which I've wanted to make since I first saw it. I like the combination of lace and garter stitch. I like the shape and how it’s worn. I liked how it could be a showcase for lots of different yarn. Plus, I thought the recipient would like it too which is always an important thing to consider when making gifts. Can’t just make stuff you like after all.

It was a pretty quick knit even considering that I had to rip it out - totally my own fault - and make it bigger. The pattern calls for an aran weight yarn, but I mistakenly picked out a DK weight instead. Mrs Crosby Carpet Bag is a beautiful silk wool single and I don’t regret picking it at all. 

I've wanted to knit the Dewberry Cowl since I first saw it, and it was a perfect pattern for gift knitting. FO: Crescent Over Lothlorien and Dewberry Cowl - withwool.com

Mailing these goodies off was hard but, I’ve got the patterns and plenty of worthy yarn. I already have the perfect skein picked out for my Dewberry.

Pattern: Dewberry by Hillary Smith Callis 

Yarn: 1 skein Mrs Crosby Carpet Bag - Hollywood Cerise

Needles: US 6 (4mm) circulars

Date: October 26 - November 4, 2015

@Ravelry

Spinning Cashmere

I'm spinning my first skein of 100% cashmere, and it's not as difficult as all my reading made it out to be. Don't let the fear of messing up hold you back. 

2 ounces of cashmere ended up in my fiber stash innocently enough. A friend of mine asked me if I would spin it for her and, of course, I agreed. She’s an awesome friend who deserves handspun, and I wanted to spin cashmere. It’s a win-win in my book. When the cashmere arrived it was as soft and lovely and amazing as I expected it would be. Then the doubt set in. Sure, I knew how to spin yarn, but most of my experience was with long-stapled, grabby wool. Everything I’ve read about cashmere told me it was slippery and had a relatively short staple length. Plus, I hadn’t figured out how to spin fine singles on my wheel yet which was what the cashmere would require. So the fiber sat for I don’t don’t know how long.

I’m spinning my first skein of 100% cashmere, and it's not as difficult as all my reading made it out to be. Don't let the fear of messing up hold you back. 

It wasn’t until my successful attempt spinning a 3-ply sock yarn during Tour de Fleece 2015 that I started seriously thinking about spinning the cashmere. Spinning that sock yarn meant that I’d finally figured out how to draft a fine yarn. That was half of the hurdle was gone. Now, only the fear of messing up the fiber - because I repeatedly read that it was hard to spin - was holding me back. I didn’t want to waste my friend’s cashmere. If the fiber had been mine, it’d probably still be sitting in fluffy little bundles. It’s not mine though, and I’d been holding on to it for long enough. The only thing left to do was start.

I’m spinning my first skein of 100% cashmere, and it's not as difficult as all my reading made it out to be. Don't let the fear of messing up hold you back. 

My end goal is to spin a 2-ply fingering weight yarn. Getting the wheel set up in the beginning with just the right amount of tension and twist took some fiddling. The first setting put twist into the fiber but didn’t pull it onto the bobbin. The second adjustment had too much twist and not enough uptake. The third attempt, on a larger whorl setting, was just right with enough twist and enough uptake.

I’m spinning my first skein of 100% cashmere, and it's not as difficult as all my reading made it out to be. Don't let the fear of messing up hold you back. 

I want the yarn to be lofty and airy so I went with a woolen style draft where the twist comes into the fiber supply — only a little twist though since I’m aiming for a fingering weight yarn. Then I waited for the spinning to be hard. I working my way through the second single at the moment, and I’m still waiting for the spinning to be hard. Has it taken more patience and attention? Definitely, but spinning cashmere isn’t the insurmountable challenge that I’d created in my head. Just goes to show that the only way to know that something is “hard”, is to not let fear hold you back and try it for yourself.

I am by no means an expert at spinning cashmere. Not even a little. I’m just fumbling along and finding what works. Are my singles perfect? No, but they’re fairly consistent and holding together. Fingers crossed that the pair doesn’t fall apart during plying - then I’ll have to take back that whole ‘I can spin cashmere’ thing. Stayed tuned for adventures in plying.

I’m spinning my first skein of 100% cashmere, and it's not as difficult as all my reading made it out to be. Don't let the fear of messing up hold you back.